From eScan Wiki
←Older revision | Newer revision→
eScan Version 14 Online Help
Anti-theft
Our personal devices are constantly at risk of being lost or stolen. If your device is ever lost or stolen, eScan Anti-Theft will let you track the missing device using localization by IP address, helping you retrieve your device and protect personal data. eScan Anti-Theft is a new feature introduced in eScan Total Security Suite Version 1802 and above that increases user-level security in the case of a lost or stolen device. Using advanced technologies such as IP address lookup, image capture, screenshots, lock down of device, Alerts, scream, and Data wipe. These wide varieties of techniques ease down the process of tracking the device in case of lost or stolen.
Contents |
How to activate the anti-theft feature?
To activate the anti-theft feature on your system, you need to register and add your system on to the anti-theft portal. The first time ever you open the feature on your windows system, it will ask you to create an account on the anti-theft portal and login with the same credentials on your system.
Note:
- If you already have anti-theft portal login details for Android or iOS, you can use the same user details for windows system as well.
- If you already have an account refer step 7
Follow these steps to create a rescue disk
- Click eScan Rescue Disk creation link, the eScan Rescue File creation interactive wizard will open and follow the instructions on screen.
Steps for Creating New Account
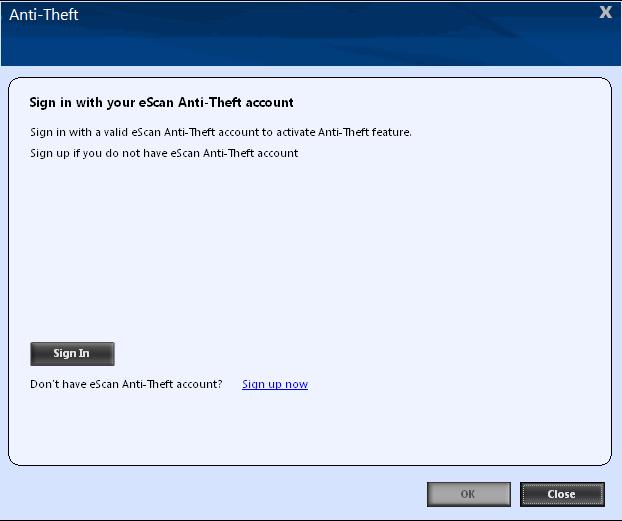
- 1. Click Anti-Theft from the Tools option on the Quick Access Link and a window Anti-Theft will open as shown in below figure.
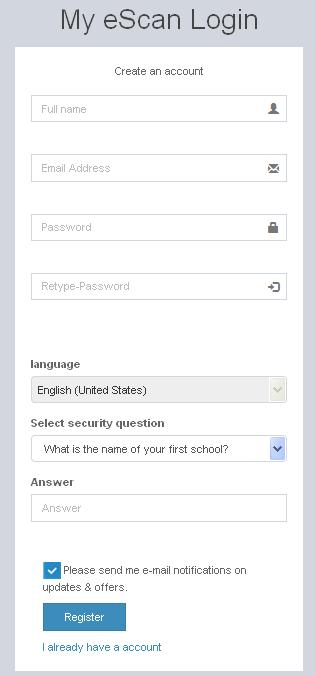
- Click Sign In and enter your login details if you already have an account or Click the Sign up now to create an account; you will be redirected to My eScan login page as shown in the below figure.
- Click Create new account link on this page and enter your details and click Register.
- The following message will be displayed on screen.
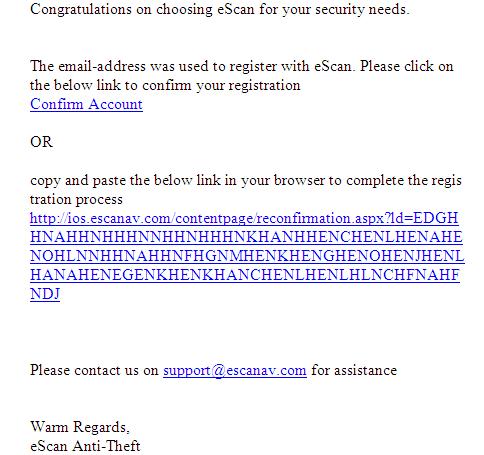
- You will receive an email on your registered email address with the following message; Click on the confirm account link or copy paste the link in your browser
- A confirmation as in the below image will be displayed on screen. Click on the Here link to go back to the login page.
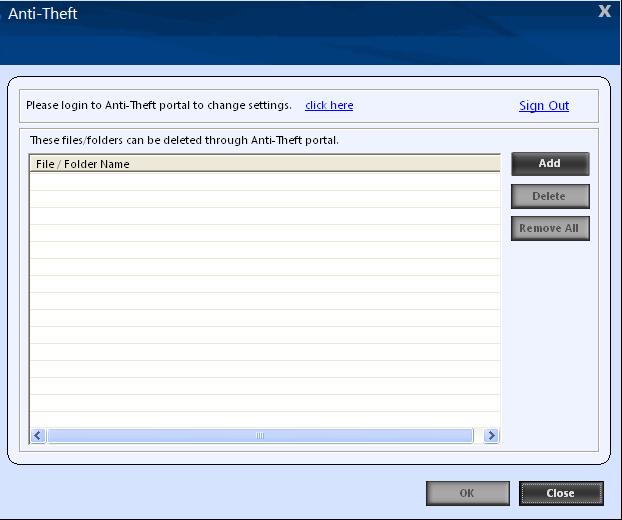
- Now login to the system with the same credentials. Anti-theft window will be displayed as shown in the below figure.
- Click Add option on this page, a new window “Add files and folders” will open, Select the object type (whether you want to add files or folders)on this window and Click Browse.
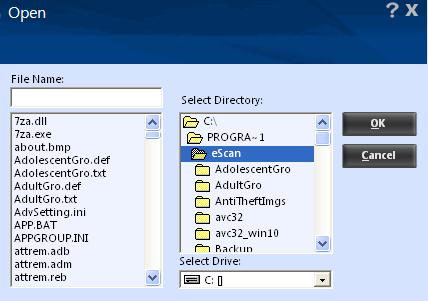
- On the Open window, you can select the drive, directory and files and folders and click ok
- You will be redirected to Add files and folders window, click Add on this window to add the files and folders to the list.
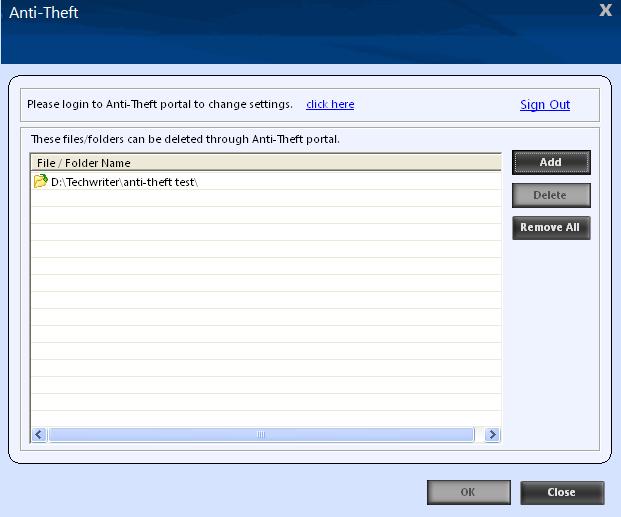
- The files/folders added to the list will be displayed as in the figure below. You will have to add the files and folders that have any kind of confidential information, these files and folders will be remotely deleted from the anti-theft portal incase of loss or theft.
Anti-theft Portal
Anti-Theft portal is an online portal that can be accessed through any computer, laptop, tablet or phone at www.escanav.com. From the anti-theft portal, you can trace the last location of your lost or stolen system through this portal. The first time you log into the system, you will have to register on the ant-theft portal. This will help you in tracing your system in case of loss or theft. You can use the scream option to check if the phone is in the vicinity, if you still can’t find the system, set the system as lost / stolen on the anti-theft portal and the Locate, Scream, Camera and Alert features will be activated and will be performed on the system.
Note: The lost/stolen system should be connected to the internet for efficient functioning of all the features
You can remotely execute the following commands through the Anti-Theft portal on your lost Windows. For the successful execution of the commands, the laptops will have to be added to the anti-theft portal prior to the loss or theft of the device.
- On the anti-theft portal it will display all your Windows, Android and iOS devices that are added to the portal.
- Incase of loss or theft, click on the laptop name that has been lost or stolen, the status bar under it will display the system name again and when it was last seen.
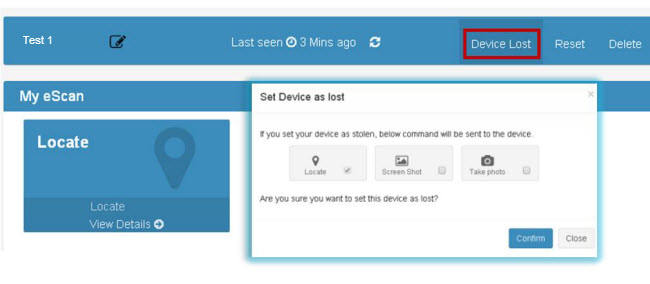
- Click Device Lost and this will allow you to enable the features Locate, ScreenShot and Camera.
- Click Confirm to confirm that your system has been lost and to execute the commands Locate, Screenshot and Camera.
- This option will allow you to locate the system in case of loss/ theft. Click on the Locate option on the anti-theft portal and the last known location of the system will be displayed on the map.
Procedure to Locate the system
- Click Locate, the status will change to Request Pending; the status will be updated as soon as the system is synced with the server. Request pending indicates that your request to locate the system is in progress
- View Details displays the Last Location of your system on a map. It also shows details of last two successful executions of the Locate command.
- This option will take a screen shot of the system whenever it is synced to the server.
- Click Screenshot, the status will change to Request Pending; the status will be updated as soon as the system is synced with the server. Request pending indicates that your request to take a screenshot is in progress.
- View Details displays the last two screenshots from the successful execution of the screenshot command.
- This option will allow you to take a snapshot of the current user of the system from the webcam on clicking the camera option on the anti-theft portal.
- Click Camera, the status will change to Request Pending; the status will be updated as soon as the system is synced with the server. Request pending indicates that your request to take a snapshot is in progress.
- View Details displays the last two snapshots taken from your system.
- Click Reset to reset the “Action features” on the system; these actions can be performed on the system when it has been lost or stolen.
Lock
- The Lock feature will block the system from any further access. You will have to unblock the system by entering the pin provided on the anti-theft portal.
- On the anti-theft portal, select your System Alias name and then click Lock to remotely block your system, to unblock your system you will have to enter the Secret Code provided at the time of executing the lock command.
Scream
- Scream will allow you to raise a loud alarm on the system; this will allow you to trace the system if it is in the vicinity.
- Click Scream option to remotely raise a loud alarm on your system.
Alert
- This option will allow you to send an alert message (up to 200 characters) to the lost system. This alert message will be displayed on the screen; you can write and send any message for example: Request a callback or send your address or any kind of message to the current holder of your system. With this option there will be a higher chance of your lost system being returned.
- Click Alert option to remotely send a message to your lost system. Type in your message in the send message section and click confirm.
Data Wipe
- The Data Wipe feature will delete all the selected files and folders that have been added to the list to be deleted from the portal.
- Click Data Wipe option to remotely wipe all the selected files and folders or only delete the cookies and click confirm.
Points to remember 1. Successful execution of all the features is completely dependent on the internet connection on the lost / stolen laptop. 2. If the device is set as lost, the time taken for the device to sync with the anti-theft portal is five minutes. 3. The Status for all the features and actions will remain as “Request Pending” till the lost or stolen laptop is synced with the eScan anti-theft portal. 4. If the device is not set as lost, it will take ten minutes to sync with the anti-theft portal if the system is connected to the internet. 5. The camera and Screenshot feature will save only the last two successful executions on the anti-theft portal. 6. Once you have recovered your system, click on “I recovered device” to deactivate all the features.

