From eScan Wiki
| Revision as of 09:54, 25 August 2015 Webmktg (Talk | contribs) (→'''Tools''') ← Previous diff |
Revision as of 11:22, 25 August 2015 Webmktg (Talk | contribs) (→'''Tools''') Next diff → |
||
| Line 42: | Line 42: | ||
| Disk Defragmenter is a system utility for analyzing local volumes and locating and consolidating fragmented files and folders. | Disk Defragmenter is a system utility for analyzing local volumes and locating and consolidating fragmented files and folders. | ||
| + | |||
| + | '''NOTE:This feature is not available in eScan Internet Security Suite and eScan Anti-Virus edition.''' | ||
| =='''Vulnerability Scanner'''== | =='''Vulnerability Scanner'''== | ||
| This option will check the vulnerability of the software installed on your computer for any kind of weakness that can be used by the attacker to gain access to the information stored on your computer without your permission. Using the options present in Vulnerability Scanner module of eScan, you can easily update the listed software with the more secured version of the same. | This option will check the vulnerability of the software installed on your computer for any kind of weakness that can be used by the attacker to gain access to the information stored on your computer without your permission. Using the options present in Vulnerability Scanner module of eScan, you can easily update the listed software with the more secured version of the same. | ||
| + | |||
| + | '''NOTE:This feature is not available in eScan Internet Security Suite and eScan Anti-Virus edition.''' | ||
| =='''Download eScan Service Pack'''== | =='''Download eScan Service Pack'''== | ||
| Line 54: | Line 58: | ||
| eScan safe mode protection is available if you have Microsoft Windows Workstation operating system installed on your computer. | eScan safe mode protection is available if you have Microsoft Windows Workstation operating system installed on your computer. | ||
| It allows you to password protect Microsoft Windows safe mode booting option, as to restrict the user to boot in to safe mode directly. The operating system becomes vulnerable in safe mode as in safe mode many of the drivers are not loaded and also the essential security features like Firewall, Anti-Virus real time protection, and so on may not work correctly. | It allows you to password protect Microsoft Windows safe mode booting option, as to restrict the user to boot in to safe mode directly. The operating system becomes vulnerable in safe mode as in safe mode many of the drivers are not loaded and also the essential security features like Firewall, Anti-Virus real time protection, and so on may not work correctly. | ||
| - | |||
| - | =='''Import/ export Settings'''== | ||
| - | |||
| - | This option to Export the settings configured by you in eScan. These settings can be imported and implemented automatically in eScan whenever the drive is formatted and eScan is freshly installed. These settings can also be used on other computers with eScan. | ||
| =='''Import/ Export Settings'''== | =='''Import/ Export Settings'''== | ||
| This option to Export the settings configured by you in eScan. These settings can be imported and implemented automatically in eScan whenever the drive is formatted and eScan is freshly installed. These settings can also be used on other computers with eScan. | This option to Export the settings configured by you in eScan. These settings can be imported and implemented automatically in eScan whenever the drive is formatted and eScan is freshly installed. These settings can also be used on other computers with eScan. | ||
| + | |||
| + | '''NOTE:This feature is not available in eScan Internet Security Suite and eScan Anti-Virus edition.''' | ||
| =='''USB Vaccination'''== | =='''USB Vaccination'''== | ||
| Line 69: | Line 71: | ||
| eScan will scan for issues in the selected registry entries, all issues found will be displayed in the Panel on the right. You can select / unselect the issues found by eScan and fix selected issues button to fix the issues. eScan will fix the selected issues instantly. | eScan will scan for issues in the selected registry entries, all issues found will be displayed in the Panel on the right. You can select / unselect the issues found by eScan and fix selected issues button to fix the issues. eScan will fix the selected issues instantly. | ||
| + | |||
| + | '''NOTE:This feature is not available in eScan Internet Security Suite and eScan Anti-Virus edition.''' | ||
| =='''eBackup'''== | =='''eBackup'''== | ||
| Line 201: | Line 205: | ||
| ::::*Now open eBackup option present under Tools in Total Security Suite. | ::::*Now open eBackup option present under Tools in Total Security Suite. | ||
| ::::*All saved backup jobs will be displayed in the backup list, select and restore the desired backup job using Restore option present at the bottom of the window. | ::::*All saved backup jobs will be displayed in the backup list, select and restore the desired backup job using Restore option present at the bottom of the window. | ||
| + | |||
| + | '''NOTE:This feature is not available in eScan Internet Security Suite and eScan Anti-Virus edition.''' | ||
Revision as of 11:22, 25 August 2015
eScan Version 14 Online Help
Tools
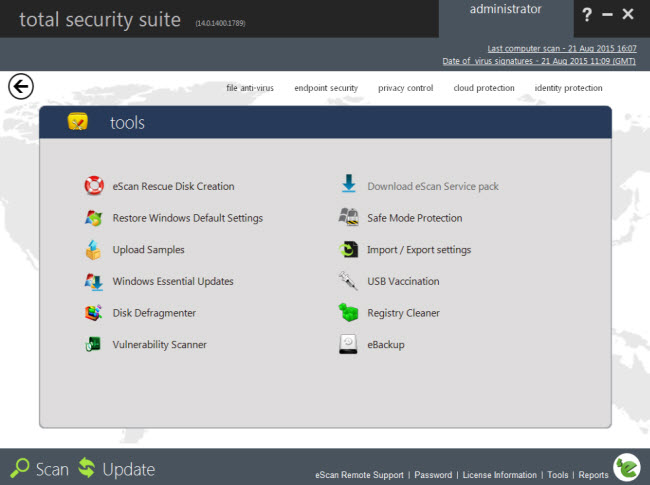
The Tools link is located on lower-right corner of the screen. It provides various options, which helps you to quickly access the tools at ease. Each tool contains certain activities to perform, which are explained below.
eScan Rescue Disk Creation
eScan Rescue wizard will allow you to create the eScan Rescue ISO image file. You will have to burn the Image on to a CD/DVD ROM/ USB device before using it to repair/clean infected or damaged systems.
Follow these steps to create a rescue disk
- Click eScan Rescue Disk creation link, the eScan Rescue File creation interactive wizard will open and follow the instructions on screen.
Restore windows Default Settings
You can restore the Windows® operating system settings, such as desktop and background settings, to eliminate all the modifications made by a virus attack by using this button. eScan automatically scans your computer for viruses when you click this button and sets the system variables to their default values.
Upload Samples
It will allow you to post your queries on the website (Clicking on this link will take you to our website). You can also upload sample files here to support your question.
Windows essential updates
It will update your system with the latest windows patch updates. eScan maintains a list of critical Windows Update patches on every computer that are available for free, whenever the user clicks on “Download Latest Hotfix (Microsoft Windows OS)” option, it checks the computer for missing patches on the OS by matching the installed patches with the released patch list in the database. The missing critical Windows update patches are then downloaded and installed on the computer where eScan is running. The database list is categorized on the basis of the operating system.
Disk Defragmenter
Disk Defragmenter is a system utility for analyzing local volumes and locating and consolidating fragmented files and folders.
NOTE:This feature is not available in eScan Internet Security Suite and eScan Anti-Virus edition.
Vulnerability Scanner
This option will check the vulnerability of the software installed on your computer for any kind of weakness that can be used by the attacker to gain access to the information stored on your computer without your permission. Using the options present in Vulnerability Scanner module of eScan, you can easily update the listed software with the more secured version of the same.
NOTE:This feature is not available in eScan Internet Security Suite and eScan Anti-Virus edition.
Download eScan Service Pack
eScan opens the MicroWorld Download Manager and starts downloading the latest critical hotfix for the Windows® operating system from the Microsoft® Web site.
Safe Mode Protection
eScan safe mode protection is available if you have Microsoft Windows Workstation operating system installed on your computer. It allows you to password protect Microsoft Windows safe mode booting option, as to restrict the user to boot in to safe mode directly. The operating system becomes vulnerable in safe mode as in safe mode many of the drivers are not loaded and also the essential security features like Firewall, Anti-Virus real time protection, and so on may not work correctly.
Import/ Export Settings
This option to Export the settings configured by you in eScan. These settings can be imported and implemented automatically in eScan whenever the drive is formatted and eScan is freshly installed. These settings can also be used on other computers with eScan.
NOTE:This feature is not available in eScan Internet Security Suite and eScan Anti-Virus edition.
USB Vaccination
- eScan will vaccinate USB based storage devices that will protect your computer from Malware that spread through USB devices as the eScan Vaccinated devices cannot get infected even when they are used on infected systems. For preventing spread of auto run -based malware infection eScan provides an advanced USB Vaccination feature that replaces the autorun.inf file present on any USB Drive with its own autorun.inf file that cannot be modified or deleted manually or by any malicious program. This file is created in such a way that it does not allow malicious program to execute on any system to which the USB Drive is mounted on, irrespective whether the system is protected by AV or not. The vaccinated drive can be used normally for copying and transferring files from one computer to other without any concern for malware spreading through USB drives even if the PCs are not protected by any antivirus. The drive will remain vaccinated till it is formatted by the user or de-vaccinated using eScan.
Registry Cleaner
eScan will scan for issues in the selected registry entries, all issues found will be displayed in the Panel on the right. You can select / unselect the issues found by eScan and fix selected issues button to fix the issues. eScan will fix the selected issues instantly.
NOTE:This feature is not available in eScan Internet Security Suite and eScan Anti-Virus edition.
eBackup
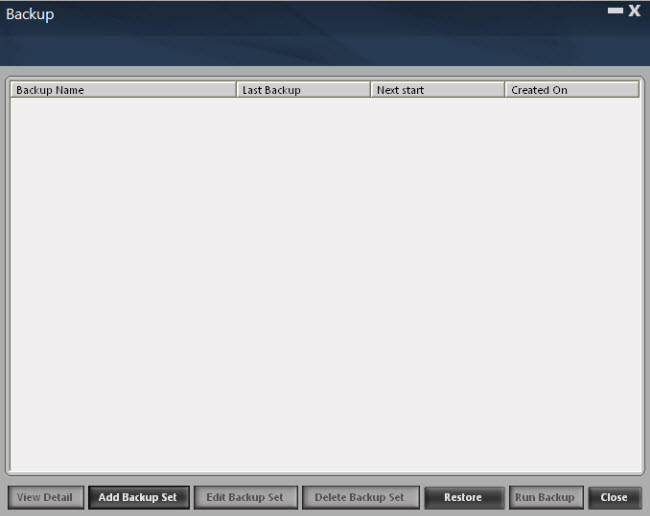
Taking regular backup of your critical files stored on your computer is very important, as it can be lost or damaged due to issues such as virus outbreak, modification by a ransomware or another user. This feature of eScan total security suite allows you to take backup of your important files stored on your computer such as documents, Photos, media files, music files, contacts and so on. You can define the path to store the backed up data either on your computer, CD/DVD or USB Drive. It allows you to schedule the backup process by creating tasks. The backed up data is stored in an encrypted format in a folder secured by eScan’s real-time protection. You can create Backup jobs by adding files, folders to take backup either manually or schedule the backup at a defined time or day.Click on eBackup option to initiate a backup.
Taking Backup
Adding Backup Set
Click Add Backup Set option to create a new backup job, it allows you to take backup either manually or schedule a backup at a desired time; it also allows you to add files and folder for taking backup.
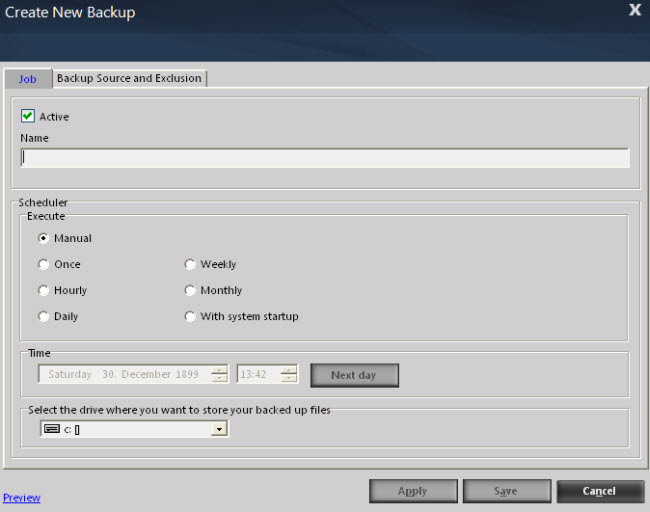
Creating New Backup Job
- Job: This tab will allow you to create a new back up job for your important files /folders. The following options are available in this tab:
- Active: Select this check box to activate a backup schedule. The backup process will be run only for active backup jobs. Inactive Backup Set is displayed in Red.
- Name: Enter a name in this field; this will be name of the backup schedule created by you. For example: You name this schedule “Backup080515” and all your files and folders containing Backup080515 can be added to this particular schedule.
Scheduling a Backup Job
Scheduler will allow you to schedule the backup jobs. You can schedule the backup jobs to be executed manually or schedule it just for once or on a daily/hourly/ weekly/monthly or with system start up.
- Manual: Select this option to manually run the backup. You cannot create a schedule for a manual backup. This option will allow you to take a backup on an external device as well.
- Once: Select this option to schedule the backup for only once. On selecting this option the date and time field will be activated. You can set the date and time to schedule the backup.
Note – At the time of Editing Backup Set - Active option cannot be un-ticked for the Backup Jobs that have been scheduled to run only once by the user.
- Hourly: Select this option to schedule the backup on an hourly basis. This option allows you to take a backup of the defined backup job on an hourly basis.
- Daily: Select this option to schedule the backup on a daily basis. You will have to define a particular time at which the backup has to be taken, the backup will take place everyday at the same time.
- Weekly: Select this option to schedule the backup once in a week. It will allow you to set the day and time for the backup to be scheduled at.
- Monthly: Select this option to schedule the backup on a monthly basis. t will allow you to set the time and day of the month+ when you want the backup to take place.
- With System Startup: Select this option to take back up of all the selected files and folders every time the system is started. You should be selected the drive where you want the back up files and folders to be placed.
Note - Scheduled Job will be executed only if the Laptop is connected to a Power Source. In case at the scheduled time the Laptop is on Battery mode the Scheduled backup job will start only when it is connected to a power source next time.
Selecting the destination folder for Storing backed up Data
- Select the drive where you want to store your backed up Files
- This option allows you to select the drive where you wish to store the backed up files. You can select either the hard drive partitions or you can write the data on CD/DVD or store it on a USB Drive. In case if the space is less than the Backup set size on the selected drive, you will be informed through the following popup message.
Backup Source and Exclusion
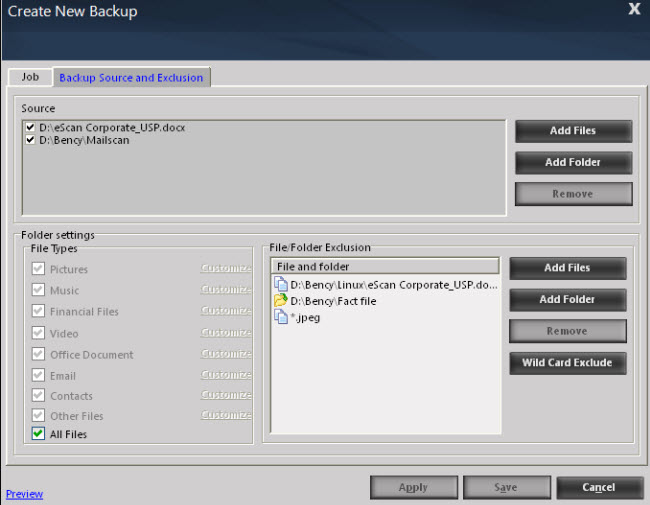
In this section you will add the source files and folders for which the backup has to be taken. It will also allow you to exclude some files and folders from the backup process. It will also allow you to customize the file types for the backup or you can also include all types of files for the backup.
- Source
- In this section you will add the files and folders to backup. It has the following options:
- Add Files: Click this option to browse and add files to backup.
- Add Folder: Click this option to browse and add folders to backup.
- Remove: Select a file or folder and click Remove to remove it from the backup process
- Folder Settings
- This section will allow you to define the type of files that you want to backup. Select All Files to include all types of files. In case if you want to include only certain types of files, it will allow you to customize the file types as per your requirement.
- File and Folder Exclusion
- This option allows you to add Files or Folders that you wish to be excluded from the selected Backup set.
- Add Files – Click on this option to Add desired files to the exclusion list from the selected backup set. No backup will be taken of the selected file whenever a backup is run.
- Add Folder – Click on Add Folder to add a sub folder to the exclusion list from the selected backup set. No backup will be taken of the selected sub folder whenever a back is run.
- Wild Card Exclude - This option allows you to exclude files by adding their extensions to the File and Folder Exclusion list. For example – If you wish to exclude all notepad files from the backup set, you can simply add *.txt in the File and Folder Exclusion list. No backup will be taken of the files having extension *.txt whenever a backup is run.
- Preview – Click on this option to view the Files included in the backup set.
How to add customized file types?
- Select the check box next to file types option and click customize. A new window Customize File Type will open.
- Click Add option on this window, another window Add Extension will open.
- Enter the extension type and also give a brief description about the extension type and click Add.
- The file type will be added to the customized list.
Editing Backup
- Edit Backup will allow you to edit an existing backup job. Select an existing backup job and click Edit Backup. The Create New Backup window will open. You can make the required changes to the existing backup job.
- Delete Backup set: It will allow you to delete an existing backup job, Select an existing backup job and click delete, this will delete the selected backup job.
- Restore: It will allow you to restore the backup files and folders.
Procedure to Restore Files
- Click Restore, the Restore File window will open, Click Next on this window.
- Search for the specific file to be restored by entering a name or part of the file name in the search box OR click on List All Files link to display the list of all the files.
- By default all the files will be selected, select only those files that you want to restore and click Selected Files. All the unselected files will be removed from the list.
- Select the option Original Location to restore the files to the original location(The selected backup set will be restored at the original path of the backed up file or Folder) Or Select the option New Location and Click Browse to restore the files to a new location.
- Click Restore, this will restore the selected backup set and you will be informed through a message Backup Successfully Restored will be displayed. The restored files can be accessed either from original path(Where the Backed up files were stored) the pre-defined path
- Run Backup: Click Run backup to take a manual backup of the selected backup job.
Procedure to Run Backup
- Select an existing backup job and click Run Backup, the message Backup completed successfully will be displayed.
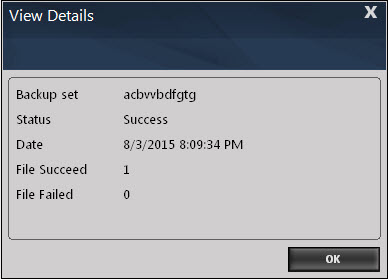
- View Details: It will display the details of the selected backup job schedules, it also displays the status of the backups that have failed / succeeded, along with the date and time stamp. It also displays the total number of files that have been backed up successfully and the files for which the backup has failed.
Restoring Data in case of System format or re-installing eScan Total Security Suite on the system
- You can easily restore the data that has been backed up earlier before the format if you have saved the backed up folder on a USB Drive or a CD /DVD .
- Procedure - Restoring Data in case of System format
- Install Total Security Suite on your computer
- Copy the eBackup Folder in the path where you have saved the backup before the format.
- Now open eBackup option present under Tools in Total Security Suite.
- All saved backup jobs will be displayed in the backup list, select and restore the desired backup job using Restore option present at the bottom of the window.
NOTE:This feature is not available in eScan Internet Security Suite and eScan Anti-Virus edition.
