From eScan Wiki
| · eScan · MailScan · Technologies | · Technical Info · Security Awareness · User Guides |
eScan Version 11(and above) Online Help
Mail Anti-Virus (eMail Scanning)
This section provides the description and settings of eScan's Mail Anti-Virus for scanning of emails.
Contents |
Description
This module scans all incoming and outgoing e-mails for viruses, spyware, adware, and other malicious objects. It also helps you send virus warnings to client computers and allows you to view archived e-mails and reports on the Mail Anti Virus activities. By default, Mail Anti Virus scans only the incoming e mails and attachments but you can configure it to scan outgoing e-mails and attachments as well. It helps you notify the sender or system administrator whenever you receive an infected e-mail or attachment.
In addition, Mail Anti-Virus lets you archive e-mails and e-mail attachments so that you do not need to worry about losing your important e-mails. You can also configure it to compress large e-mail attachments automatically to conserve bandwidth.
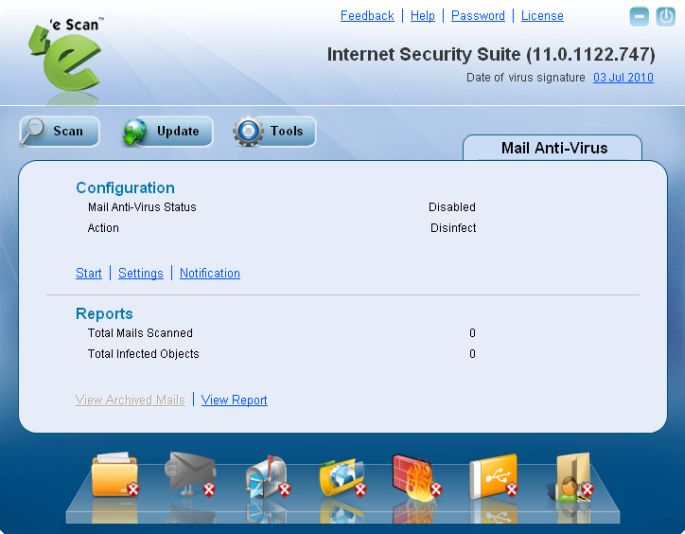
When you select the Mail Anti-Virus icon, the tabbed page of shows you options for configuring the module and helps you view reports on the recent scans performed by ‘e Scan. The details regarding each of the sections in the right pane are as follows:
Configuration section
This section provides you with information regarding the status of Mail Anti Virus and the action that it will take when it detects a malicious object.
- Mail Anti Virus Status - It shows whether the Mail Anti Virus module is running or not.
- Action - It shows the action that ‘e Scan will perform if a malicious object is detected.
In addition, you can configure the following settings.
- Start/Stop - This link enables or disables the Mail Anti Virus module. You can easily switch the Mail Anti Virus module from the Start state to the Stop state and vice versa by using this link.
- Settings - This link opens the Mail Anti Virus Settings dialog box, which helps you configure the Mail Anti Virus settings.
The Mail Anti Virus Settings dialog box
You can configure Mail Anti Virus for real time monitoring by using this dialog box.This dialog box contains several tabs that allow you to configure settings for scanning e-mails; compressing and decompressing attachments; addressing security vulnerabilities, and archiving e-mails.
I. Scan Options:-
This tab allows you to select the e-mails to be scanned and action that should be performed when a security threat is encountered during a scan operation.
This tab helps you configure the following settings.
- a) Block Attachments Types -
- This section provides you with a predefined list of file types that are often used by virus writers to embed viruses. Anye mail attachment having an extension included in this list will be blocked or deleted by MWL at the gateway level. You can add file extensions to this list as per your requirements. As a best practice, you should avoid deleting the file extensions that are present in the Block Attachments Types list by default.
- Add - You should click this button to add the file extension of the file format that youneed to block. This button is only enabled when you type the file extension in the Block Attachments Types box.
- Delete - You can click this button toremove an extension from the existing list of blocked file extensions.
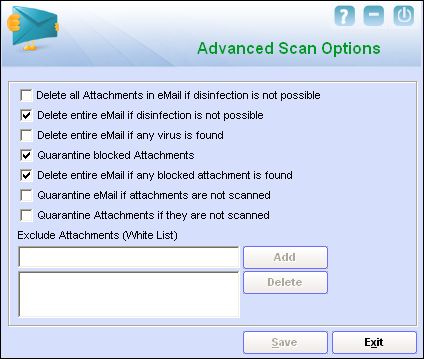
- Advanced - You should click this button to open the Advanced Scan Option dialogbox. This dialog box helps you configure advanced options for scanning e mails.
- The Advanced Scan Options dialog box
- This dialog box includes several options that help you configure the Mail Anti Virus to scan e mails for malicious code.
- i) Delete all Attachment in eMail ifdisinfection is not possible - You should select this check box if you need to delete all the e mail attachments that cannot be cleaned.
- ii) Delete entire eMail if disinfection is not possible - [Default] You should select this check box if you need to delete the entire e mail if an attachment cannot be cleaned.
- iii) Delete entire eMail if any virus is found- You should select this check box if you need to delete the entire e mail if it is infected.
- iv) Quarantine blocked Attachments -[Default] You should select this check box if you need to quarantine the attachment if it is has an extension that is blocked by ‘e Scan.
- v) Delete entire eMail if any blocked attachment is found - [Default] You should select this check box if you need toblock an e mail if it contains an attachment with an extension type that is blocked by ‘e Scan.
- vi) Quarantine eMail if attachments are not scanned - You should select this check box if you need to quarantine an entire e mail if it contains an attachment that is not scanned by Mail Anti Virus.
- vii) Quarantine Attachments if they are not scanned - You should select this check box if you need to quarantine attachments that are not scanned by Mail Anti Virus.
- viii) Exclude Attachments (White List) - This list is empty by default. You can add file names and file extensions that should not be blocked by ‘e Scan. You can alsoconfigure ‘e Scan to allow specific files even though if the file type is blocked. For example, if you have listed *.pif in the list of blocked attachments and you need to allow an attachment with the name abcd.pif,you can add abcd.pif to the Exclude Attachments list. Adding *.pif files in this section will allow all *.pif to be delivered. MicroWorld recommends you to add theentire file name like abcd.pif.
- Add - You should click this button if youneed to add a file type to the whitelist.
- Delete - This option helps you delete afile type from whitelist.
- Save - You can click this button to save the settings that you have made within this dialog box.
- b) Action -
- This section helps you configure the actions to be performed on infected e mails. These operations are as follows:
- Disinfect - [Default] This option is selected by default. You should select this option if you need Mail Anti-Virus to disinfect infected e mails or attachments.
- Delete - You should select this option causes if you need Mail Anti-Virus to delete infected e mails or attachments.
- Quarantine Infected Files - [Default] This check box is selected by default. You should select this check box if you need Mail Anti-Virus to quarantine infected e mails or attachments.
- Quarantine Path - The default path for storing quarantined e mails or attachments is C:\Program Files\eScan\QUARANT. You can specify a path of your choice by clicking Browse.
- c) Port Settings - You need to specify which ports on the SMTP Mail Server should be used for incoming and outgoing e mails so that ‘e Scan can scan the e mails sent or received via those ports.
- Mail Server Settings - If you configure this setting, ‘e Scan will send e mail notifications about the actions that it should perform when it detects infected e mails. This setting helps you create outbreak alerts, and create warning messages and notifications that ‘e Scan should send when it detects any security breach. The mail server settings that you need to configure are as follows:
- SMTP Mail Server - You need to specify the IP address of the SMTP Mail Server of your organization or Internet Service Provider (ISP). The default value of the IP address of an SMTP Mail Server is 127.0.0.1.
- SMTP Port - You need to specify a port number for the SMTP Mail Server of your organization or ISP. The default value for the port number of an SMTP Mail Server is 25.
- User Authentication (Opt.) - You need to provide the user name if the mail server of your organization or ISP requires authentication to send e mails.
- Authentication Password (Opt.) - You need to provide the password if the mail server of your organization or ISP requires authentication to send e mails.
- d) Port Settings for eMail - You can also specify the ports for incoming and outgoing e mails so that ‘e Scan can scan the e mails sent or received via those ports.
- Outgoing Mail (SMTP)- You need to specify a port number for SMTP. The default value of this port number is 25.
- Incoming Mail (POP3) - You need to specify a port number for POP3. The default value of this port number is 110.
- Scan Outgoing Mails - You should select this check box if you need to Mail Anti-Virus to scan outgoing emails.
II. Compression / Decompression options:-
- You can configure the following settings to ensure that the available bandwidth is effectively utilized.
This tab helps you configure the following settings.
- Compress outbound attachments -This check box is disabled by default. ‘e Scan reduces the size of all outgoing e mail attachments by compressing them when this check box is enabled,.
- Create self extracting zip files - This check box is disabled by default. ‘e Scan automatically creates a self extracting zip file containing the attachment when this check box is enabled - The receiver can click this file to uncompress it. Theadvantage of this feature is that it eliminating the need for an unzipping tool to be installed on the user’s computer. As a best practice, you should select this check box to ensure that the receiver can uncompress the attachment even when a decompression tool is not available.
- Uncompress inbound attachments - You should select this check box when you need ‘e Scan to automatically unpack compressed files in inbound attachments,scan them, and then deliver them to you.
- Uncompress inbound attachments (Local Domain) - This check box is disabled by default. When you enable this check box, it appears as selected. You should select this check box when you need ‘e Scan to automatically unpack compressed files in inbound attachments, scan them, and then deliver them to the recipients in the local domain.
- Do not compress files with extensions- You can exclude specific file types within outgoing e mail attachments from being compressed by adding them to an excluded attachments list.
- Add - You can click this button to add a file or file type to the list of files that are excluded from being compressed by ‘e Scan when you send hem as attachments.
- Delete - You can click this button to delete a file or file type from the list of files that are excluded from being compressed by ‘e Scan when you send them as attachments.
- Remove All - You can click this button to delete a file or file type from the list of files that are excluded from being compressed by ‘e Scan when you send them as attachments.
- 6. Compression options –
- This section contains options that help you configure the various parameters for compressing files. These parameters include the percent up to which the file should be compressed, the minimum size ofthe files to be compressed, and the compression ratio. This section contains the following options.
- Compress only if compression % greater than - You use this setting tocompress all e mail attachments up to 25 percent or more. The default value is 25 percent.
- Compress if Attachment size is above (Kb) - The default value is 50. You use this setting to compress all e mail attachments thatare larger than the specified size.
- Select the compression ratio - You can use this setting to specify the compression ratio and make optimum use of system resources. It has the following options.
- Default - This same as the Max. Speed option.
- Max. Speed - You can use this option to try to compress attachments as fast as possible.
- Max. Compression - You can use this option to try to compress attachments to the maximum.
III. Vulnerabilities I –
Authors of malicious software of often exploit vulnerabilities in Web browsers,such as Windows® Internet Explorer® (IE) and propagate malicious to computers via e mail clients like Microsoft® Office Outlook® and Microsoft® Outlook® Express. ‘e Scan also includes proactive scanning features that protect your data from such vulnerabilities.
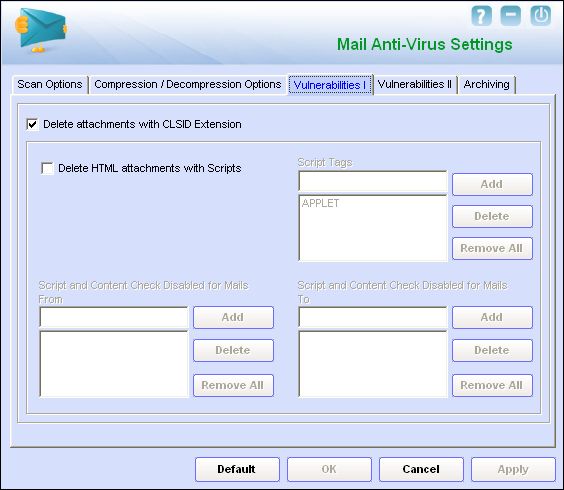
- The following configuration options are available on this screen.
- Delete attachments with CLSID Extensions - [Default] This option is selected by default. CLSID are hidden files that do not show the actual file extension. If you select this option, Mail Anti Virus deletes the attachments with CLSID file extensions to prevent dangerous files from exploiting the vulnerabilities in IE.
- Delete HTML attachments with Scripts - E mails clients help you send and receive in different formats. For example, the HTML format. HTML files can include scripts, which are similar to batch files or .bat files. These scripts are embedded within specialized tags and can be used to run malicious code. Hackers often use scripts to execute malicious code on the computers of their victims. You can configure Mail Anti-Virus to delete HTML attachments with scripts by selecting the Delete HTML attachments with Script option. You can also specify the tags that ‘e Scan should check for in the attachments so that the attachments containing those tags are deleted. By default, the Script Tags list, the Script and Content Check Disabled for Mails From list, and the Script and Content Check Disabled for Mails To list are disabled.
- Script Tags - This section contains a list that contains script tags. ‘e Scan will delete all e-mail attachments in the HTML format containing the tags included in this list. You can configure this list to block HTML attachments that contain these tags.
- Add - You can click this button to add an HTML tag to the list of tags.
- Delete - You can click this button to delete the HTML tag from the list of tags.
- Remove All - You can click this button to delete the all the HTML tag from the list of tags.
- 4. Script and Content check disabled for mails From - This section contains a list of e-mail addresses or domain names that you consider as legitimate senders. This feature of ‘e Scan is useful when you need to add a genuine user and receive legitimate e mails in the HTML format with scripts. You can add e mail addresses or domain names of such users to the list. All emails in the HTML format with scripts coming from those users or domains are automatically delivered to your inbox.
- Add - You can click this button to add an e mail address or domain to the list.
- Delete - You can click this button to delete an e mail address or domain from the list.
- Remove All - You can click this button to delete the all an e mail addresses or domains from the list.
- 5. Script and Content check disabled for mails To - This section contains a list of e-mail addresses or domain names, which you consider as legitimate recipients. This feature of ‘e Scan is useful when you need to send e mails in the HTML format with scripts to a legitimate user. You can add e mail addresses or domain names of such users to this list.
- Add - You can click this button to add an e mail address or domain to the list.
- Delete - You can click this button to delete an e mail address or domain from the list.
- Remove All - You can click this button to delete the all an e mail addresses or domains from the list.
IV. Vulnerabilities II –
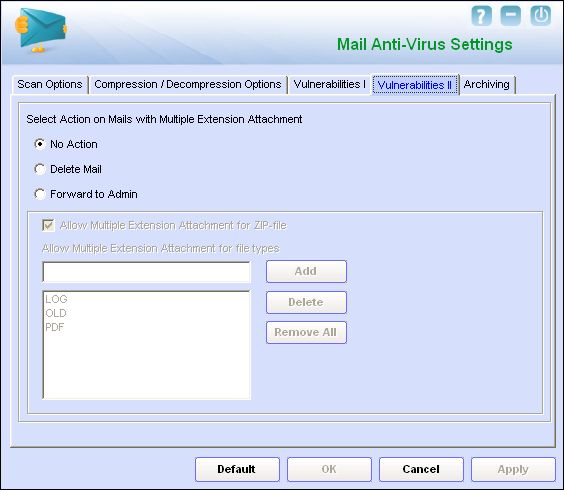
‘e Scan helps you choose the action that you can take on mails containing attachments with multiple extensions.
This tab helps you configure the following settings.
- 1. Select Action on Mails with Multiple Extension Attachment - You can configureMail Anti Virus to perform specific actions if attachments contain files with multiple extensions.
- No Action - You should select this option if you do not need Mail Anti-Virus to take any action if it detects an attachment with multiple extensions.
- Delete Mail - You select this option if you need Mail Anti-Virus to delete attachments that have multiple extensions.
- Forward to Admin. You should selectthis option if you need Mail Anti-Virus toforward the attachment having multiple extensions to the administrator.
- Note: The settings under Allow Multiple Extension attachment for ZIP file are disabled by default. They are enabled only when you select the DeleteMail option or the Forward to Admin option.
- 2. Allow Multiple Extension attachment for ZIP file - You should select this check box if you need Mail Anti-Virus to allow compressed files with multiple extensions as e-mail attachments.
- 3. Allow Multiple Extension Attachment for file types - You can add file extensions to allow such attachments containing multiple extensions to be delivered to the user’s inbox.
- Add - You can click this button to add an e mail address or domain to the list.
- Delete - You can click this button to delete an e mail address or domain from the list.
- Remove All - You can click this button to delete the all an e mail addresses or domains from the list.
V. Archiving – This screen helps you configure settings for archiving e mails and e mail attachments.
- The following configuration options are available on this screen.
- Archive eMails - This option helps you archive or back up all e mails that you have sent or received. Mail Anti-Virus provides you with the facility of backing up your e mails to a given folder. The default path for storing archived e mails is as follows: %UserProfile%\Application Data\MicroWorld\eScan\Archive. The eMail Archive Directory box is disabled by default. Therefore, to specify the path of the backup folder, you need to select the Archive eMails check box.
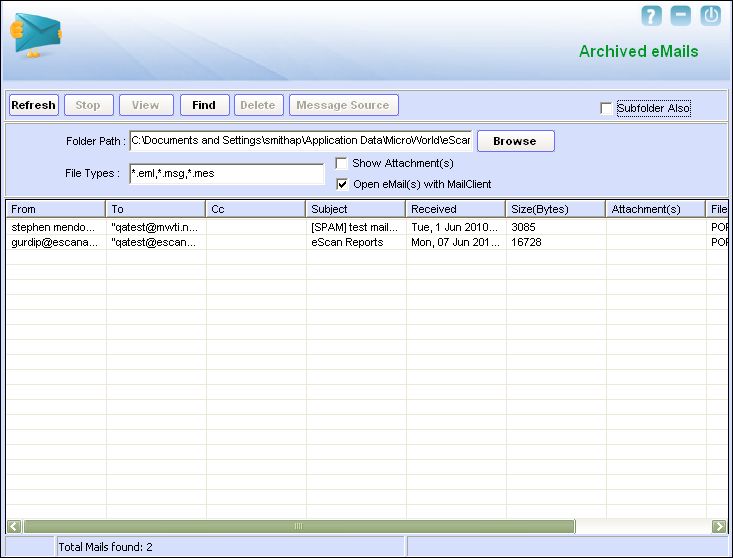
- View Archived eMails - When you click this button, the View Archived eMails window is displayed.
- The following configuration options are available on this screen.
- The View Archived eMails window
- This window shows the list of e-mails that have been archived by Mail Anti-Virus.
- The View Archived eMails window
- In this window, you can configure the following settings.
- Folder Path - You can specify the path of the folder where you need to store the archived e-mails.
- File Types - You can specify the e-mails in specific formats to be archived by specifying the formats in this box.
- Show Attachments - You can use this option to specify whether the e-mails with attachments should be displayed in the table.
- Open eMail(s) with MailClient - You can select this option to specify whether the Mail Anti-Virus should open the e-mails with the MailClient when you double-click the corresponding rows in the table.
- Refresh - You can refresh the rows in the table by clicking this button.
- Stop - You can stop Mail Anti-Virus from displaying messages by clicking this button.
- View - You can view a specific message by clicking it and then clicking this button.
- Find - You can find a specific e-mail message based on search criteria such as the sender’s e-mail address, the recipient’s e-mail address, subject, contents of the message, date before which it was received and the data after which it was received.
- Delete - You can delete a message by first selecting it in the table and then clicking this button.
- Message Source - You can view the contents of the e-mail message by clicking this button.
- 3. Archive Attachments. You should select this check box if you need to archive or back up all sent or received e mail attachments to a given folder. However, to specify the path of the backup folder, you need to select the Archive Attachments check box because the Attachments Archive Directory box is disabled by default. The default path for storing archived e mail attachments is as follows: %UserProfile%\Application Data\MicroWorld\eScan\Archive\Attachments.
- 4. Do not Archive attachments of type. At times, you may not require e-mail attachments of a specific file type. In that case, you can excluded certain file types, such as *.VCF, *.HTM, and *.HTML, from being archived by adding them to the Do not Archive attachments of type list.
- Add. You can click this button to add a file name or file type to the Do not Archive attachments of type list.
- Delete. You can click this button to delete a file name or file type from the Do not Archive attachments of type list.
Notification
This link opens the Notification Settings dialog box, which helps you configure the notification settings for the Mail Anti Virus module. By configuring this module, you can send e mails to specific recipients when malicious code is detected in an e-mail or e-mail attachment.
The Notification Settings dialog box
- This dialog box helps you configure the notification settings for sending alerts and warning messages to the senders or recipients of an infected message.
- You can configure the following notification settings.
- a. Virus Alerts - [Default] You should select this check box if you need Mail Anti-Virus to alert you when it detects a malicious object in an e-mail.
- b. Warning Mails - You configure this setting if you need Mail Anti Virus to send warning e mails and alerts to a given sender or recipient. The default sender is escanuser@escanav.com and the default recipient is postmaster.
- Attachment Removed Warning To Sender. [Default] You should select this check box if you need Mail Anti-Virus to send a warning message to the sender of an infected attachment. Mail Anti-Virus sends this e-mail when it encounters a virus-infected attachment in an e-mail. The content of the e-mail that is sent is displayed in the preview box.
- Attachment Removed Warning To Recipient. [Default] You should select this check box if you need Mail Anti-Virus to send a warning message to the recipient when it removes an infected attachment. The content of the e-mail that is sent is displayed in the preview box.
- Virus Warning To Sender. [Default] You should select this check box if you need Mail Anti-Virus to send a virus-warning message to the sender. The content of the e-mail that is sent is displayed in the preview box.
- Virus Warning To Recipient. [Default] You should select this check box if you need Mail Anti-Virus to send a virus-warning message to the recipient. The content of the e-mail that is sent is displayed in the preview box.
- Content Warning To Sender. You should select this check box if you need Mail Anti-Virus to send a content warning message to the sender. The content of the e-mail that is sent is displayed in the preview box.
- Content Warning To Recipient. [Default] You should select this check box if you need Mail Anti-Virus to send a content warning message to the recipient. The content of the e-mail that is sent is displayed in the preview box.
- c. Delete Mails From User - You can configure ‘e Scan to automatically delete e mails that have been sent by specific users. For this, you need to add the e mail addresses of such users to the Delete Mails From User list. The Delete Mails From User section is disabled by default. As you type in some text in the Delete Mails From User box and add e-mail addresses, the appropriate UI elements will be enabled.
- Add - You can click this button to add an e mail address to the list.
- Delete - You can click this button to delete an e mail address from the list.
- Remove All - You can click this button to delete the all an e mail addresses or domains from the list.
Reports
- This section displays the following information.
- Total Mails Scanned. It shows the total number of mails scanned by Mail Anti Virus on a real-time basis.
- Total Infected Objects. It shows the total number of infected objects found by Mail Anti Virus on a real-time basis.
- In addition, you can view the following reports.
- a. View Archived Mails – This link opens the View Archived eMails window.
- (See the section on the View Archived eMails window under Archiving.)
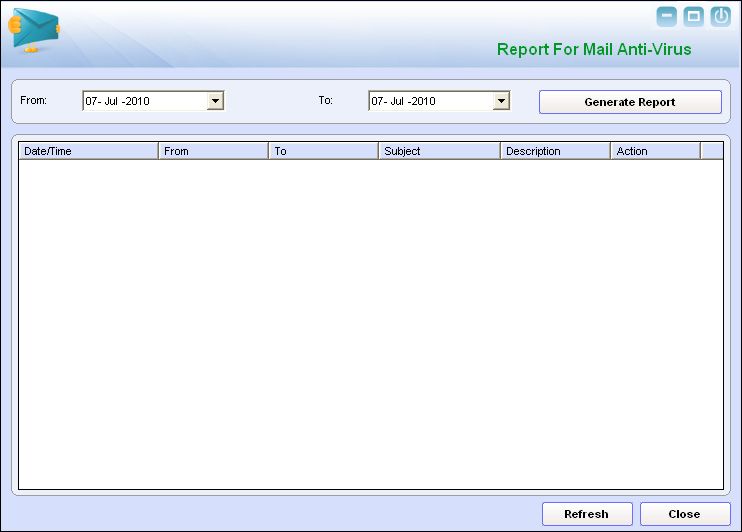
- b. View Report – This link opens the Report for Mail Anti Virus window. This window displays the summary of infected e mails and the action taken by Mail Anti Virus on such e mails.
The Report for Mail Anti Virus window
This window displays the report for the Mail Anti Virus module for a given range of dates in a tabular format when you click the Generate Report button.
- c. Generate Report - You should select a range of dates and then click this button to generate a report for the Mail Anti Virusmodule for that range of dates.
