From eScan Wiki
| Revision as of 17:37, 26 June 2009 WikiSysop (Talk | contribs) ← Previous diff |
Revision as of 18:30, 26 June 2009 WikiSysop (Talk | contribs) Next diff → |
||
| Line 32: | Line 32: | ||
| <B>A. </B> This could happen to any Drive or Folder due to lack System rights required by MWAV using the IPC scanning. | <B>A. </B> This could happen to any Drive or Folder due to lack System rights required by MWAV using the IPC scanning. | ||
| - | <B>[Note:- When MWAV (without any command line parameters) / Quick Scan is used to scan the system, it will use the IPC scanning (the title bar or MWAV / Quick Scan will display as "IPC").] </B> | + | <B>[Note:- When Quick Scan / MWAV (without any command line parameters) is used to scan the system, it will use the IPC scanning (the title bar or MWAV / Quick Scan will display as "IPC").] </B> |
| To correct this, check the following | To correct this, check the following | ||
| + | |||
| + | 1) Browse to the folder where the Quick scan / MWAV scanning gets stuck or takes longer time to complete. Right click on the folder and click on <B>Properties</B>, | ||
| + | |||
| [[Image:es-1.JPG|image|center]] | [[Image:es-1.JPG|image|center]] | ||
| + | |||
| + | |||
| + | |||
| + | 2) In the <B>Properties</B> window, select the <B>Security Tab</B>, <B>System</B> should be present under <B><U>G</U>roups or user names</B>. | ||
| + | |||
| + | To add <B>System</B> under <B><U>G</U>roups or user names</B>, click on the <B>Add</B> button, | ||
| [[Image:es-2.JPG|image|center]] | [[Image:es-2.JPG|image|center]] | ||
| + | |||
| + | |||
| + | |||
| + | 3) In the <B>Select Users and Groups</B> window, click on the <B>Advanced</B> button, | ||
| + | |||
| [[Image:es-3.JPG|image|center]] | [[Image:es-3.JPG|image|center]] | ||
| + | |||
| + | |||
| + | 4) and then click on the <B>Find Now</B> button. This will display the list of Users or Groups. Select <B>System</B> from the list and click on the <B>OK</B> button. | ||
| + | |||
| [[Image:es-4.JPG|image|center]] | [[Image:es-4.JPG|image|center]] | ||
| + | |||
| + | |||
| + | |||
| + | 5) Click on <B>OK</B> button | ||
| + | |||
| [[Image:es-5.JPG|image|center]] | [[Image:es-5.JPG|image|center]] | ||
| + | |||
| + | |||
| + | |||
| + | 6) Then click on the <B>Apply</B> and <B>OK</B> button. | ||
| [[Image:es-6.JPG|image|center]] | [[Image:es-6.JPG|image|center]] | ||
| + | |||
| + | |||
| + | Then restart the scanning using the MWAV or Quick scan. | ||
| + | |||
| + | |||
| + | |||
| + | |||
| + | |||
| + | ---- | ||
| + | <B><I><font size=2>Email us your feedback to [mailto:solutions@mwti.net solutions@mwti.net]</font></I></B> | ||
Revision as of 18:30, 26 June 2009
|
|
General |
Knowledgebase |
Support |
Q. When MWAV / Quick Scan is used to scan the system, scanning either gets stuck or takes longer time to scan.
A. This could happen to any Drive or Folder due to lack System rights required by MWAV using the IPC scanning.
[Note:- When Quick Scan / MWAV (without any command line parameters) is used to scan the system, it will use the IPC scanning (the title bar or MWAV / Quick Scan will display as "IPC").]
To correct this, check the following
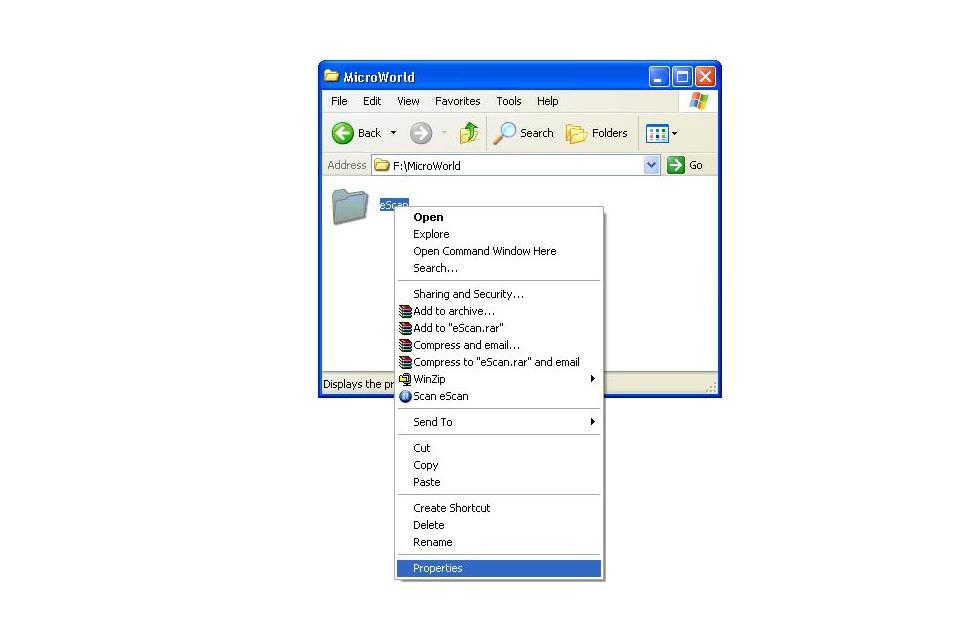
1) Browse to the folder where the Quick scan / MWAV scanning gets stuck or takes longer time to complete. Right click on the folder and click on Properties,
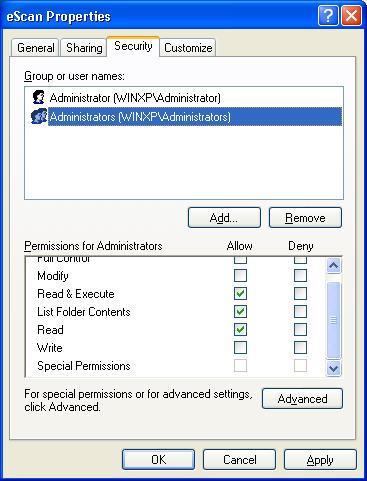
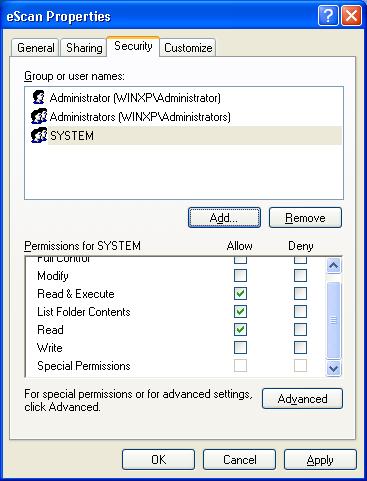
2) In the Properties window, select the Security Tab, System should be present under Groups or user names.
To add System under Groups or user names, click on the Add button,
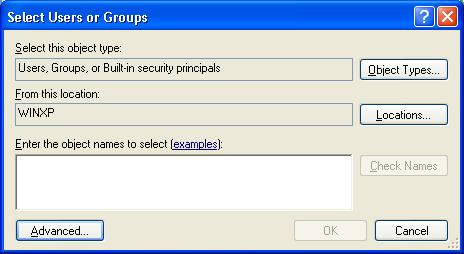
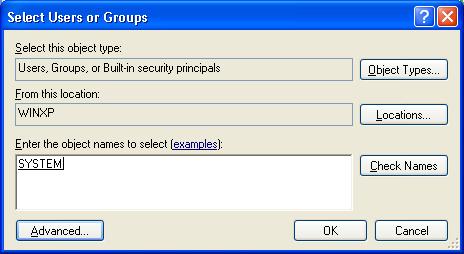
3) In the Select Users and Groups window, click on the Advanced button,
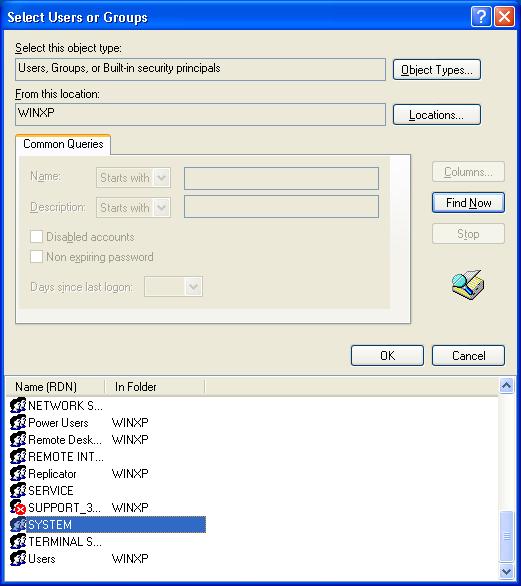
4) and then click on the Find Now button. This will display the list of Users or Groups. Select System from the list and click on the OK button.
5) Click on OK button
6) Then click on the Apply and OK button.
Then restart the scanning using the MWAV or Quick scan.
Email us your feedback to solutions@mwti.net

