From eScan Wiki
Revision as of 07:30, 4 August 2010
|
|
General |
Knowledgebase |
Support |
| · Articles · FAQ · Troubleshooting | · Technical Information - Main Page |
eScan Version 11 Online Help
Endpoint Security
Contents |
Description
This module protects your computer from data thefts and security threats via infected endpoints such as USB based portable devices. The Endpoint Security module provides an Application Control feature. However, this feature is disabled by default. This module also provides you with reports about the applications and USB devices that are allowed or blocked.
When you select the Endpoint Security icon, the tabbed page of ePC provides you with information regarding its status, options for configuring the module, and links to reports on the recent scans performed by the module.
The tabbed page shows two sections: Configuration and Reports. These two sections are described as follows:
Configuration section
This section provides you with information regarding the status of the Endpoint Security module.
- This section displays the following information.
- Endpoint Security Status - It shows whether the Endpoint Security module is running or not.
In addition, you can configure the following settings.
- Stop / Start buttons – This link enables or disables the Endpoint Security module. You can easily switch the Endpoint Security module from the start state to the stop state and vice versa by using this link.
- Settings – This link opens the Endpoint Security Settings dialog box, which helps you configure the Endpoint Security module for real time monitoring.
The Endpoint Security Settings dialog box
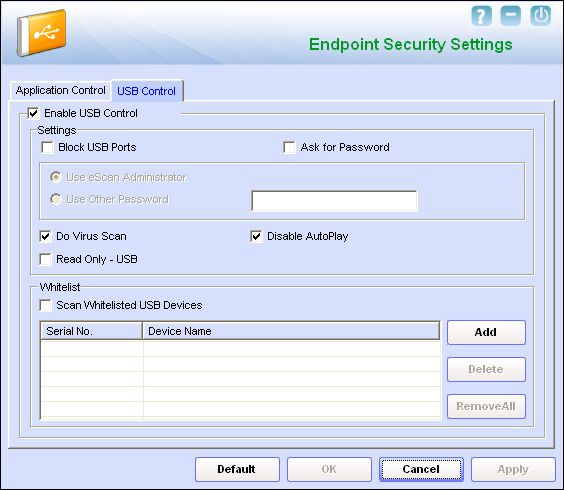
- This dialog box has two tabs: Application Control and USB Control. These two tabs are described as follows:
- I. Application Control
- This tab helps you control the execution of programs on the computer. By default, all the controls on this tab are disabled.
- This tab helps you configure the following settings.
- Enable Application Control Section - You should select this check box if you need to enable the Application Control feature of the Endpoint Security module.
- Enter Application to Block – You should the name of the application to be blocked in this box.
- List of Blocked applications - This list contains blocked executables under categories that are predefined by MicroWorld. Each of the applications listed in the predefined categories are blocked by default. In addition, you can also add executables that you need to block to the Custom Group category. You can unblock an executable by clearing the check box next to it. The predefined categories include the following:
- Computer Game - This category contains the list of computer games, which are blocked by default.
- Instant Messengers - This category contains the list of instant messenger programs like Yahoo!® Messenger, MSN® Messenger, which are blocked by default.
- Music Video Players. This category contains the list of music video players programs, which are blocked by default.
- P2P Applications - This category contains the list of P2P applications, which are blocked by default.
- The following additional options are available when you right click the list.
- Allow This Group - This option helps you allow a selected group.
- Block This Group - This option helps you block a selected group.
- Process Details - This option opens a Web page on the ‘e Scan Web site. This Web page displays information regarding the selected process.
- The Endpoint Security Settings dialog box also shows these buttons.
- Block. This button blocks the selected application in the Custom Group from running.
- Delete. This button deletes the selection application from the Custom Group.
- II. USB Control
- The Endpoint Security feature of ‘e Scan protects your computer from malicious software that may enter your computer via USB storage devices. It does this by asking you for the password whenever you plug in a USB storage device.
- The USB Control tab of the Endpoint Security Settings dialog box helps you configure the following settings.
- Enable USB Control – You should select this check box if you need to monitor all the USB storages devices connected to your computer.
- Settings -
- This section helps you customize the settings for controlling access to USB storage devices.
- Block USB Ports - You should select this check box if you need to block all the USB ports.
- Ask for Password - This check box is selected by default. You should select this check box if you need ‘e Scan to prompt for a password whenever a USB storage device is connected to the computer. You will not be able to access the USB storage device until you enter the correct password. As a best practice, you should always keep this check box selected.
- Use eScan Administrator - You should select this check box if you need ‘e Scan to prompt you to enter the ePC password whenever you try to access a USB storage device.
- Use Other Password - You can also specify a unique password for accessing USB Storage devices. You should select this check box if you need ‘e Scan to prompt you for a password whenever you try to access a USB storage device.
- Do Virus Scan - [Default] When you select this option, the Endpoint Security module runs a virus check when the USB storage device is activated. As a best practice, you should always keep this option selected.
- Disable AutoPlay - [Default] When you select this option, ‘e Scan disables the automatic execution of any program stored on a USB storage device when you connect the device.
- Read Only-USB - This option allows you to access the USB device in read-only mode.
- Whitelist -
- ‘e Scan provides a greater level of endpoint security by prompting you for a password whenever you plug in a USB drive. To disable password protection for a specific device, you can add it along with its serial number to the whitelist. The next time you plug-in the device it will not ask for a password but will directly display the files or folders stored on the device. This section displays the serial number and device name of each of the whitelisted devices in a list. You can add devices to this list. The Whitelist section displays the following buttons.
- Add - You can click this button to add a device name and number to the whitelist. You can add devices to a whitelist in two ways.
- Delete - You can click this button to remove a device from the whitelist.
- Remove All - You can click this button to remove all the devices from the whitelist.
Reports section
- This section displays the following information.
- Total Applications Allowed - It shows the total number of applications allowed by the Endpoint Security module.
- Total Applications Blocked - It shows the total number of applications blocked by the Endpoint Security module.
- In addition, you can view the following reports.
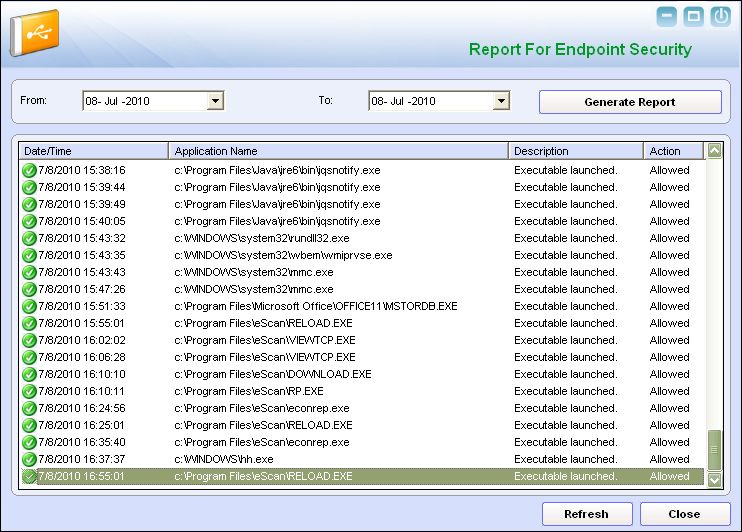
- View Report – This link opens up the Report For Endpoint Security window.
The Report for Endpoint Security window
- This window displays the report for the Endpoint Security module for a given range of dates in a tabular format when you click the Generate Report button.
- Generate Report - You should select a range of dates and then click this button to generate a report for the Endpoint Security module for that range of dates.


