From eScan Wiki
| Revision as of 03:37, 3 July 2012 Webmktg (Talk | contribs) (→<b>Update</b>) ← Previous diff |
Revision as of 09:56, 30 July 2012 Webmktg (Talk | contribs) Next diff → |
||
| Line 25: | Line 25: | ||
| == <b>Update</b>== | == <b>Update</b>== | ||
| - | |||
| Line 33: | Line 32: | ||
| | | ||
| - | [[Image:UPdate window.jpg|center]] | + | [[Image:Update window.jpg|center]] |
| | | ||
| * '''<b>Configuration:</b> | * '''<b>Configuration:</b> | ||
| - | This section displays the following information: | + | This section includes two links — Settings and Update now |
| <b>Settings:</b> | <b>Settings:</b> | ||
| - | This link is available only for an administrator, but a normal user can also access and configure these settings by logging on as an administrator. Click this link, if you want to configure the internet settings for downloading automatic anti-virus updates. | + | This link is available only for an administrator, but a normal user can also access and configure these settings by logging on as an administrator. |
| + | Click this link, if you want to configure the internet settings for downloading automatic anti-virus updates. | ||
| | | ||
| [[Image:Update - Settings window.jpg|center]] | [[Image:Update - Settings window.jpg|center]] | ||
| | | ||
| + | |||
| + | <ol> | ||
| + | <li>On the <b>Update Settings</b> tab, specify the following field details.</li> | ||
| + | |||
| + | {| id="table1" style="border-collapse: collapse; border-color: #000000; padding: 1px" width="110%" border="1" cellspacing="1" | ||
| + | |- bgcolor="#ffffff" valign="center" | ||
| + | | style="border-style: solid; border:"1"; border-width: 1px" width="30%" height="25" bgcolor="#D0E7F6" align="left" | | ||
| + | <font face="Arial">'''Field'''</font> | ||
| + | | style="border-style: solid; border:"1"; border-width: 1px" width="200" bgcolor="#D0E7F6" align="left" | | ||
| + | <font face="Arial">'''Description'''</font> | ||
| + | |- bgcolor="#ffffff" | ||
| + | | style="border-style: solid; border:"1"; border-width: 1px" width="300" align="left" valign=top | <font face="Arial">'''Automatic update (hrs:min) starts at every Hours'''</font> | ||
| + | | style="border-style: solid; border:"1"; border-width: 1px" width="336" align="left" valign="center" |It indicates a time for automatic updates. | ||
| + | By default, the start time appears. The start time indicates the time when you have installed eScan. If you want you can change the start time, and then type the hours. The hours indicate the duration after which you want eScan to repeat downloading updates from the specified start time. | ||
| + | By default, it is selected. Select this check box, if you want to specify start time and hours. | ||
| + | |- bgcolor="#ffffff" | ||
| + | | style="border-style: solid; border:"1"; border-width: 1px" width="300" align="left" valign=top | <font face="Arial"> '''Warn, if virus signature is more than days old'''</font> | ||
| + | | style="border-style: solid; border:"1"; border-width: 1px" width="336" align="left" valign="center" |It indicates the number of days after which you want eScan to warn you, if the virus signatures exceed the specified number of days. | ||
| + | By default, it is selected. Select this check box, if you want to specify number of days. | ||
| + | |- bgcolor="#ffffff" | ||
| + | | style="border-style: solid; border:"1"; border-width: 1px" width="300" colspan = "3" align="left" | <font face="Arial">'''Connection Settings'''</font> | ||
| + | |- bgcolor="#ffffff" | ||
| + | | style="border-style: solid; border:"1"; border-width: 1px" width="300" align="left" valign=top | <font face="Arial"> '''Connection time out (sec.)'''</font> | ||
| + | | style="border-style: solid; border:"1"; border-width: 1px" width="336" align="left" valign="center" | It indicates the connection time in seconds. | ||
| + | The connection disconnects after the specified time. | ||
| + | |- bgcolor="#ffffff" | ||
| + | | style="border-style: solid; border:"1"; border-width: 1px" width="300" align="left" valign=top | <font face="Arial"> '''Connection retry'''</font> | ||
| + | | style="border-style: solid; border:"1"; border-width: 1px" width="336" align="left" valign="center" | | ||
| + | It indicates the time allotted for connection to retry. | ||
| + | The connection retries to connect after the specified time, if it is disconnected due to specified time in <b>Connection time out</b> field. | ||
| + | |- bgcolor="#ffffff" | ||
| + | | style="border-style: solid; border:"1"; border-width: 1px" width="300" colspan = "3" align="left" | <font face="Arial">'''Proxy Settings''' | ||
| + | It helps you to configure the proxy settings for connecting to the internet to download the AV updates.</font> | ||
| + | |- bgcolor="#ffffff" | ||
| + | | style="border-style: solid; border:"1"; border-width: 1px" width="300" align="left" valign=top | <font face="Arial"> '''Download via Proxy'''</font> | ||
| + | | style="border-style: solid; border:"1"; border-width: 1px" width="336" align="left" valign="center" | | ||
| + | Select this check box if you want to specify the proxy setting details. | ||
| + | |- bgcolor="#ffffff" | ||
| + | | style="border-style: solid; border:"1"; border-width: 1px" width="300" align="left" valign=top | <font face="Arial"> '''IP'''</font> | ||
| + | | style="border-style: solid; border:"1"; border-width: 1px" width="336" align="left" valign="center" | Type the IP address of the internet proxy server. | ||
| + | |- bgcolor="#ffffff" | ||
| + | | style="border-style: solid; border:"1"; border-width: 1px" width="300" align="left" valign=top | <font face="Arial"> '''Port'''</font> | ||
| + | | style="border-style: solid; border:"1"; border-width: 1px" width="336" align="left" valign="center" |Type the port of the internet proxy server. | ||
| + | |- bgcolor="#ffffff" | ||
| + | | style="border-style: solid; border:"1"; border-width: 1px" width="300" colspan = "3" align="left" | <font face="Arial">'''Proxy authentication''' | ||
| + | This field is available only when you select the <b>Download via Proxy</b> check box.</font> | ||
| + | |- bgcolor="#ffffff" | ||
| + | | style="border-style: solid; border:"1"; border-width: 1px" width="300" align="left" valign=top | <font face="Arial"> '''Name'''</font> | ||
| + | | style="border-style: solid; border:"1"; border-width: 1px" width="336" align="left" valign="center" | This field is available only when you select the <b>Download via Proxy and Proxy authentication</b> check box. | ||
| + | Type the user name for the internet proxy server. | ||
| + | |- bgcolor="#ffffff" | ||
| + | | style="border-style: solid; border:"1"; border-width: 1px" width="300" align="left" valign=top | <font face="Arial"> '''Password'''</font> | ||
| + | | style="border-style: solid; border:"1"; border-width: 1px" width="336" align="left" valign="center" | This field is available only when you select the <b>Download via Proxy and Proxy authentication</b> check box. | ||
| + | Type the password. | ||
| + | |- bgcolor="#ffffff" | ||
| + | | style="border-style: solid; border:"1"; border-width: 1px" width="300" align="left" valign=top | <font face="Arial"> '''Set to default'''</font> | ||
| + | | style="border-style: solid; border:"1"; border-width: 1px" width="336" align="left" valign="center" | Click this link to set the default settings. | ||
| + | |} | ||
| + | |||
| + | |||
| + | <li>Click the <b>Save</b> button.</li> | ||
| + | The settings get saved. | ||
| + | </ol> | ||
| + | |||
| + | |||
| + | |||
| + | |||
| + | |||
| <b>Update now:</b> | <b>Update now:</b> | ||
Revision as of 09:56, 30 July 2012
| · eScan · MailScan · Technologies | · Technical Info · Security Awareness · User Guides |
eScan Anti-Virus Security for Mac Version 5.x Online Help
Contents |
Update
The Update module helps you to configure settings for automatic virus updates. You can make connection and proxy settings for updates. You have to ensure that your computer is connected to internet, so that the latest updates are downloaded and you receive them on a set time. Alternatively, you can visit www.escanav.com, website for offline updates, which are available on a weekly basis.
Click this module, if you want to configure the update settings. A normal user can access Settings link only through the administrator login.
- Configuration:
This section includes two links — Settings and Update now
Settings:
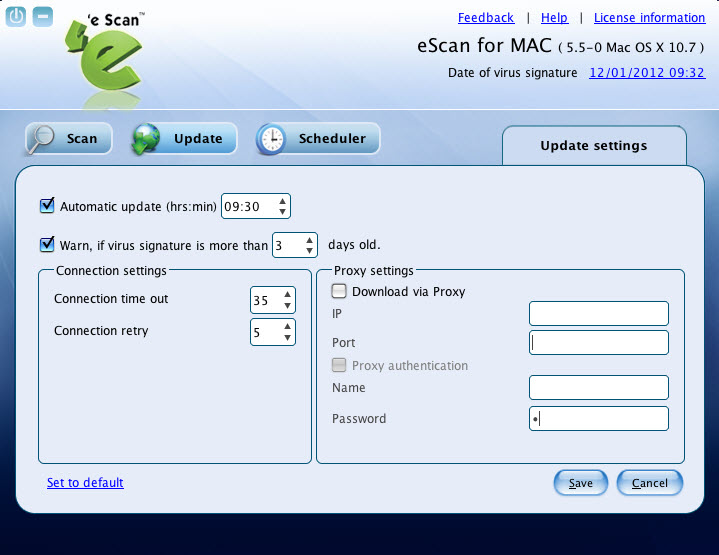
This link is available only for an administrator, but a normal user can also access and configure these settings by logging on as an administrator. Click this link, if you want to configure the internet settings for downloading automatic anti-virus updates.
- On the Update Settings tab, specify the following field details.
- Click the Save button.
|
Field |
Description | |
| Automatic update (hrs:min) starts at every Hours | It indicates a time for automatic updates.
By default, the start time appears. The start time indicates the time when you have installed eScan. If you want you can change the start time, and then type the hours. The hours indicate the duration after which you want eScan to repeat downloading updates from the specified start time. By default, it is selected. Select this check box, if you want to specify start time and hours. | |
| Warn, if virus signature is more than days old | It indicates the number of days after which you want eScan to warn you, if the virus signatures exceed the specified number of days.
By default, it is selected. Select this check box, if you want to specify number of days. | |
| Connection Settings | ||
| Connection time out (sec.) | It indicates the connection time in seconds.
The connection disconnects after the specified time. | |
| Connection retry |
It indicates the time allotted for connection to retry. The connection retries to connect after the specified time, if it is disconnected due to specified time in Connection time out field. | |
| Proxy Settings
It helps you to configure the proxy settings for connecting to the internet to download the AV updates. | ||
| Download via Proxy |
Select this check box if you want to specify the proxy setting details. | |
| IP | Type the IP address of the internet proxy server. | |
| Port | Type the port of the internet proxy server. | |
| Proxy authentication
This field is available only when you select the Download via Proxy check box. | ||
| Name | This field is available only when you select the Download via Proxy and Proxy authentication check box.
Type the user name for the internet proxy server. | |
| Password | This field is available only when you select the Download via Proxy and Proxy authentication check box.
Type the password. | |
| Set to default | Click this link to set the default settings. | |
The settings get saved.
Update now:
You can update database at any time by clicking this link.
- Report:
This section displays the following information:
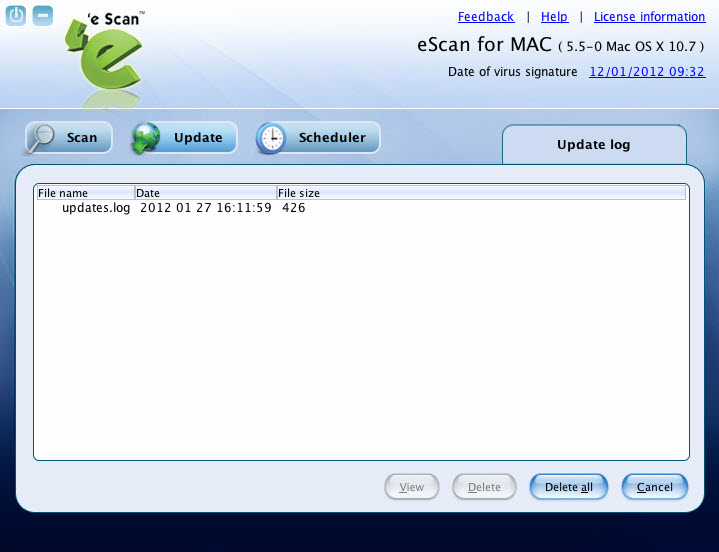
View log:
A log of the downloaded files are created, which you can view or delete when required.


