From eScan Wiki
| Revision as of 06:38, 5 March 2013 Webmktg (Talk | contribs) (→'''Tools''') ← Previous diff |
Revision as of 06:39, 5 March 2013 Webmktg (Talk | contribs) (→'''Tools''') Next diff → |
||
| Line 15: | Line 15: | ||
| | | ||
| - | [[Image:Toolsnew.jpg|left]] | + | [[Image:Toolsnew.jpg|center]] |
| | | ||
Revision as of 06:39, 5 March 2013
eScan Version 14 Online Help
Tools
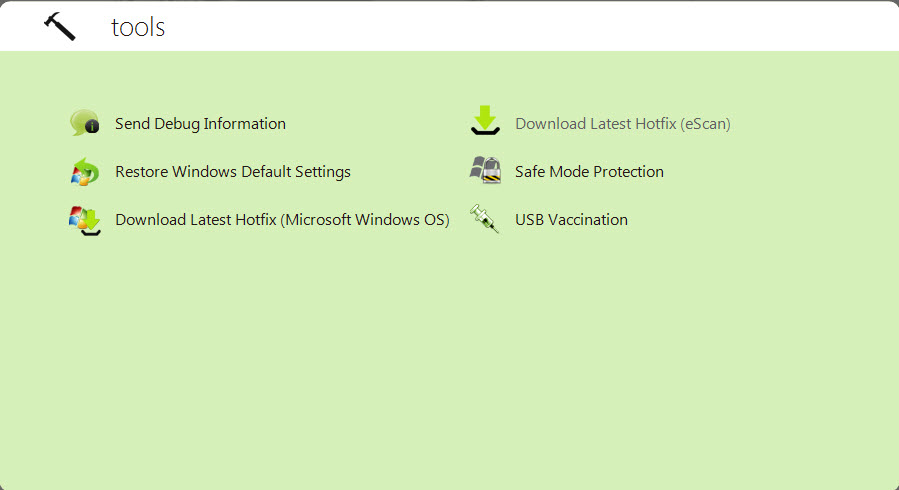
The Tools link is located on lower-right corner of the screen. It provides various options, which helps you to quickly access the tools at ease. Each tool contains certain activities to perform, which are explained below.
Creating eScan Rescue ISO Image File
Click this button to open the eScan Rescue File Creation Wizard, which helps you to create a Windows® based Rescue Disk file. The Rescue Disk file helps you create a clean bootable CD to provide you a clean boot on infected computers running the Windows® operating system. You can then eradicate rootkits and file infectors that cannot be cleaned in the normal Windows® mode.
Once the eScan Rescue disk is downloaded, you can now also update it using this wizard.
For more information on how to create the eScan Rescue Disk file, visit the following link.
http://download1.mwti.net/download/wikifiles/eScan_Rescue_Disk.pdf
Downloading Latest eScan Hotfix
You need to have internet connection, to access this feature. When you click this button, eScan opens the MicroWorld Download Manager and starts downloading the latest hotfix from eScan update servers.
Running Safe Mode Protection
eScan safe mode protection is available if you have Microsoft Windows Workstation operating system installed on your computer.
It allows you to password protect Microsoft Windows safe mode booting option, as to restrict the user to boot in to safe mode directly. The operating system becomes vulnerable in safe mode as in safe mode many of the drivers are not loaded and also the essential security features like Firewall, Anti-Virus real time protection, and so on may not work correctly.
Downloading Latest Microsoft Windows OS Hotfix
When you click this button, eScan opens the MicroWorld Download Manager and starts downloading the latest critical hotfix for the Windows® operating system from the Microsoft® Web site.
Sending Debug Information
Click this button to open the Please type your Problem here! dialog box. It allows you to specify the eScan-related problem and generate the debuges.zip file. The debuges.zip file is a special file that contains critical eScan files and settings. It is stored in the Program Files\eScan\Debug folder. You can send the problem description along with the debuges.zip file to eScan’s technical support team, so that they can analyze it and assist you in resolving the problem.
To send the description of the problem, you need to specify the following information in appropriate fields.
• Mail From: [Default: escanuser@escanav.com] Type e mail address of the sender.
• Mail To: [Default: support@escanav.com] Type e mail address of the recipient. The recipient of this e mail is usually the eScan’s technical support team.
• SMTP Server: [Default: mail.mwti.net] Type IP address of the SMTP server.
• SMTP Port: [Default: 25] Type port number of the SMTP port.
• User Authentication (Opt.): Type the user name, however adding this information is optional.
• Authentication Password (Opt.): Type the password, however adding this information is optional.
Click the OK button to send an e-mail along with the debuges.zip file to eScan’s technical support team.
Restoring Windows Default Settings
You can restore the Windows® operating system settings, such as desktop and background settings, to eliminate all the modifications made by a virus attack by using this button. eScan automatically scans your computer for viruses when you click this button and sets the system variables to their default values.
Uploading Samples
This feature helps you to submit the virus samples to the eScan support team. Click the Upload Samples link, if you want to upload the virus samples. When you click this link, a new web page opens, where you have to click the Samples option, click the Next >> button, fill up the details in the Submit a Ticket form, and then click Submit button.
Vaccinating USB devices
The USB devices are used for various purposes, but while using them you may not be aware that the system to which you are connecting is virus infected. When connected to such machines the USB devices also tend to get infected. So, to prevent such case, eScan 14 has introduced a feature wherein you can vaccinate USB device, whenever needed. Once vaccinated it stays protected even if you connect the flash drive to an infected system, it doesn’t become a carrier to infection.
By default, the Choose a USB Drive drop-down list and Vaccinate button appears dimmed. It is available only when you connect any USB device to your system.
To vaccinate, select an appropriate USB drive, which you want to vaccinate from the Choose a USB Drive drop-down list, and click the Vaccinate button.


