From eScan Wiki
←Older revision | Newer revision→
Notification
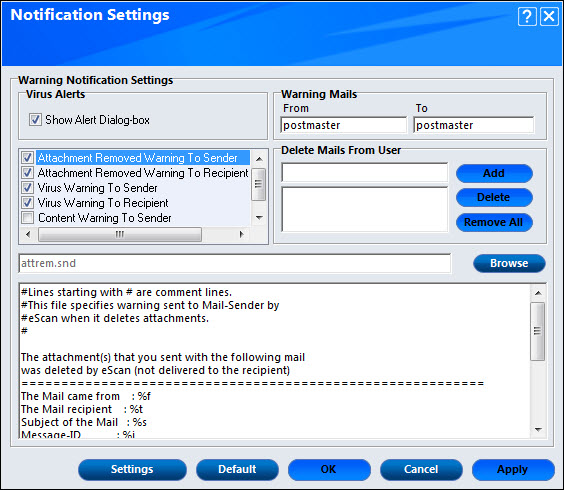
This option opens the Notification Settings dialog box, which helps you configure the notification settings. By configuring, you can send emails to specific recipients when malicious code is detected in an email or email attachment. This helps you to configure the Virus Alerts, Warning Mails, Delete emails From Users, Settings, Default, OK, Cancel, and Apply options.
You can configure the Warning Notification Settings:
Virus Alerts
This setting has Show Alert Dialog-box option that is selected by default. Select this check box if you want Mail Anti-Virus to alert you when it detects a malicious object in an email. It has more options to configure the alerts which are as follows:
- Attachment Removed Warning To Sender: Select this check box if you want Mail Anti-Virus to send a warning message to the sender cc of an infected attachment. Mail Anti-Virus sends this email when it encounters a virus-infected attachment in an email. The content of the email that is sent is displayed in the preview box. This option is selected by default.
- Attachment Removed Warning To Recipient: Select this check box if you want Mail Anti-Virus to send a warning message to the recipient when it removes an infected attachment. The content of the email that is sent is displayed in the preview box. This option is selected by default.
- Virus Warning To Sender: Select this check box if you want Mail Anti-Virus to send a virus-warning message to the sender. The content of the email that is sent is displayed in the preview box. This is selected by default.
- Virus Warning To Recipient: Select this check box if you want Mail Anti-Virus to send a virus-warning message to the recipient. The content of the email that is sent is displayed in the preview box. This option is selected by default. This option is selected by default.
- Content Warning To Sender: Select this check box if you want Mail Anti-Virus to send a content warning message to the sender. The content of the email that is sent is displayed in the preview box. This option is selected by default.
- Content Warning To Recipient: Select this check box if you want Mail Anti-Virus to send a content warning message to the recipient. The content of the email that is sent is displayed in the preview box. This option is selected by default.
Warning Mails
You can configure this setting if you want Mail Anti‑Virus to send warning emails and alerts to a given sender or recipient. The default sender (From field) is postmaster and the default recipient (To field) is postmaster.
Delete emails From User
You can configure eScan to automatically delete emails that have been sent by specific users. For this, you need to add the mail addresses of such users to the Delete emails From User list. By default, the Delete emails From User section fields are unavailable; it is available only when you type in some text in the Delete emails From User field. It has three buttons:
- Add: You can add email addresses of the users so that it deletes the email from that users.
- Delete: You can delete the email addresses of the users that is already present in the list.
- Remove All: You can remove all the email addresses at once by clicking on this button.
Settings
Click on Settings to configure Mail Server settings. This has following configuration:
- SMTP Mail Server: Enter SMTP Mail Server details
- SMTP Port: Enter the port number for SMTP.
- User Authentication (Opt.): This is optional field. You can enter the username for authentication if set.
- Authentication Password (Opt.): This is optional field. You can enter the password for same username for authentication.
The Mail Server Settings dialogue box has two buttons:
- OK: To save the configured setting.
- Exit: To exit the dialogue box without saving the configuration.
Default
Click this button to apply the default settings.
OK
Click this button after you click the Apply button to apply the configured settings.
Cancel
Click this button to cancel the configured settings or to close the window.
Apply
Click this button to apply the configured settings.


