From eScan Wiki
eScan Version 11(and above) Online Help
Web Protection
This section provides the description of eScan's Web Protection and the various settings available in this feature.
Contents |
Description
This module uses highly advanced algorithms based the occurrence of specific words or phrases in the content of the Web site to block Web sites containing pornographic or offensive material. This feature is extremely beneficial to parents because it prevents kids from accessing Web sites containing harmful or restricted content. Administrators can also use this feature to prevent employees from accessing non-work-related Web sites during work hours. The Web Protection module also comes with advanced reporting features, which keep a track of the Web sites that were blocked by ‘e Scan. You can view the Web Protection feature logs and the Popup Filter logs from the Report section of the Web Protection tab.
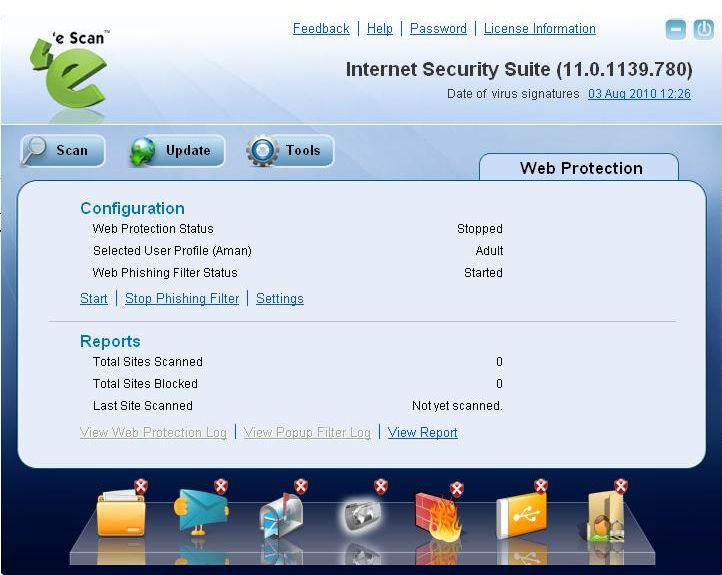
When you click the Web Protection icon, the tabbed page provides you with the information regarding its status, options for configuring the module, and links to reports on the Web sites that were scanned or blocked by the module.
The tabbed page shows two sections: Configuration and Reports. These two sections are described as follows:
Configuration section
This section provides you with information regarding the status of the Web Protection module and the Web Phishing Filter, and the selected user profile.
- This section displays the following information.
- Web Protection Status – It shows whether the Web Protection module is running or not.
- Selected User Profile – It displays the selected user profile.
- Web Phishing Filter Status – It shows whether the Web Phishing Filter is running or not.
In addition, you can configure the following settings.
- Start/Stop – This link enables or disables the Web Protection module. You can easily switch the Web Protection module from the Start state to the Stop state and vice versa by using this link.
- Stop Phishing Filter – This link enables or disables the Web Phishing Filter. You can easily switch the Web Phishing Filter from the Start state to the Stop state and vice versa by using this link.
- Settings – This link opens the Web Protection Settings dialog box, which helps you configure the Web Protection settings for monitoring Web traffic.
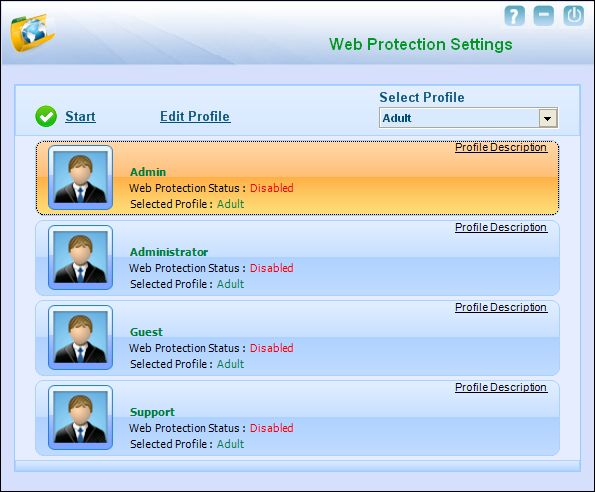
The Web Protection Settings dialog box
- This dialog box shows you the list of all user accounts created on a computer.
- In addition, it shows the following options.
I. Start/Stop – This link helps you activate or deactivate the selected user profile. You can activate a profile by selecting the user name, and then clicking Start. Web Protection will then run as per the rules that you have already defined for that profile.
II. Select User Profile – This list shows the four main profile types available in ‘e Scan. These profiles are as follows:
- Walled Garden – You should select this profile if you need to block all Web sites except the ones that are present in the whitelist. MicroWorld recommends this profile for children up to the age of 10.
- Teenager – You should select this profile when you need to block blacklisted Web sites. By selecting this profile, you can activate other filters like the Web page Filter and the Domain Name Filter. This profile uses a default threshold level of 1 and blocks HTML tags, page titles, and all Java applets and ActiveX scripts except the ones from the predefined Web site list. This profile works best for kids in the age group of 11 to 15. Default status is Block Web Access.
- Adolescent Privileged – You should select this profile when you need to block blacklisted Web sites and activate other filters like the Webpage Filter and Domain Name Filter. By selecting this profile, you can block HTML tags including page titles from rendering on the browser. Reserved word threshold of 5. This profile works best for kids in the age group of 16 to 18. Default status within Filtering Options is Active.
- Adult – This profile allows all traffic except for the Web sites in the blacklists. No reserved word threshold value is used. Default status setting within Filtering Options is Active.
III. Profile Description – This link opens the Profile Description dialog box, which provides you information about each profile type.
IV. Edit Profile – This link opens the Web Protection dialog box, which helps you customize the following profile settings for the selected user.
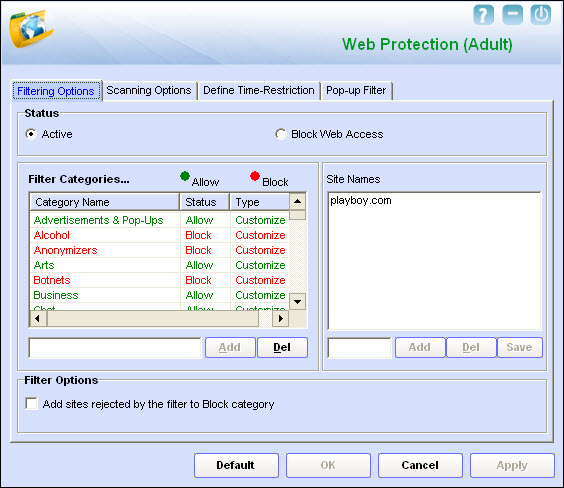
The Web Protection dialog box
- This dialog box helps you customize the following profile settings for the selected user.
- I) Filtering options This tab has predefined categories that help you control access to the Internet.
- Status Section: This section helps you allow or block access to specific Web site based on filter categories.
- Active: You should select this option when you need to block all the Web sites listed in the filter categories.
- Inactive: You should select this option when you need to disable Internet access. When you select this option, the Filter Categories section and the Filter Options section are disabled and only the Filtering Options and Popup Filter tabs are visible.
- Block Web-Access: You should select this option when you need to block all the Web sites except the ones that have been listed in the Filter Categories. When you select this option, the Filter Options section is disabled and only the Filtering Options, Define Time Restriction, and Popup Filter tabs are visible.
- Filter Categories Section: This section uses the following color codes for allowed and blocked Web sites.
- 1. GREEN . It represents an allowed Web site.
- 2. RED . It represents a blocked Web site.
- The filter categories used in this section include Pornography, Gambling, Chat, Alcohol, Violence, Drugs, Ratings_block_category, and Web sites_Allowed. You can also add or delete filter categories depending on your requirements. This section contains the following buttons.
- Add - You can click this button to add a filter category.
- Del - You can click this button to delete a filter category.
- Category: [Category name]: This section displays information regarding the following:
- Site Names - This list shows the Web sites belonging to the selected category. You can also add or delete filter categories depending on your requirements.
- Add - You can click this button to add a Web site, word, or phrase to the list.
- Del - You can click this button to delete a Web site from the list.
- Save - You can click this button to save the changes made to the category.
- Filter Options: This section provides you with options for configuring the Web site Filter.
- Add sites rejected by the filter to Block category - You should select this check box if you need ‘e Scan to automatically add Web sites that are denied access to the Block category database.
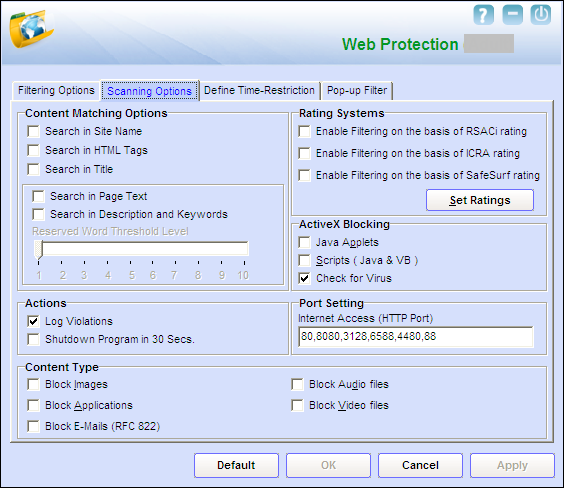
- II) Scanning options - This tab helps you enable content matching and content rating for Web site. It also helps you block images, ActiveX controls, media components, and applications from appearing within the browser.
- Content Matching Options This section allows you to configure the settings for controlling and blocking access to Internet, based on different criteria.
- Search in Site Name - You should select this check box if you need Web Protection to check whether the name of the Web site or its URL contains any reserved word or phrase listed in any of the restricted or blocked categories.
- Search in HTML Tags - You should select this check box if you need Web Protection to check whether any of the HTML tags used to format the Web page contains reserve words or phrases listed in any of the restricted or blocked categories.
- Search in Title - You should select this check box if you need Web Protection to check the title of a Web site for any of the reserve words or phrases listed in any of the restricted or blocked categories.
- Search in Page Text - You should select this check box if you need Web Protection to check the content of Web sites for the occurrence of any of the reserve words or phrases listed in any of the restricted or blocked categories.
- Search in Description and Keywords - You should select this check box if you need Web Protection to check the Web site’s description or keywords listed in the meta tags contain any of the reserve words or phrases listed in any of the restricted or blocked categories.
- Reserve Word Threshold Level - The reserve word threshold is a threshold level that once set keeps a count of the number of times a reserved word is found on the Web site. If the word appears as up to or more than the threshold level value, the access to the Web site is blocked.
- Rating Systems This section contains rules and policies defined by World-renowned organizations, such as Recreational Software Advisory Council (RSACI), Internet Content Rating Association (ICRA), and SafeSurf~~ Rating Standard (SafeSurf), which cater to content filtering on the Internet.
- Enable Filtering on the basis of RSACi rating - The RSACi rating is based on the work of Dr. Donal F. Roberts of Stanford University, who has studied the effects of media for nearly 20 years. This service rates the content on Web sites.
- Enable Filtering on the basis of ICRA rating - The ICRA rating is a global, cross-cultural, rating, and filtering service for Web sites.
- Enable Filtering on the basis of SafeSurf rating - The SafeSurf rating is designed with inputs from thousands of parents and Net Citizens to empower each family to make informed choices related to online content.
- Set Rating This button opens the Set Ratings dialog box, which contains tabs and options that help you customize the level of the Ratings Systems that should be applied to the Web sites that you visit.
- ActiveX Blocking An ActiveX control is component program that can be automatically downloaded and executed by a Web browser. It is similar to a Java applet. ActiveX controls may include malicious code and therefore may pose as a security hazard.
- Java Applets - Java Applets are programs that are written in the Java programming language. These applets can be embedded in an HTML page and can be view from a Java enabled Web browser. Applets enhance the interactivity in Web pages and provide users with an enhanced Web experience. However, some applets contain malicious code that may either disrupt the processes running on your computer or steal sensitive information. You can select the Java Applets check box to block applets from being downloaded to your computer.
- Scripts (Java & VB) - Scripts are usually written in scripting languages such as JavaScript and VBScript. A script is a list of commands that can execute without user input. With the help of scripts, you can automate certain tasks within an application to work in a particular computing scenario. Hackers often use malicious script to steal information about the victims. When you select the Scripts (Java & VB) check box, ‘e Scan blocks any script that contains any malicious code from being downloaded to your computer from the Internet.
- Check for Virus - [Default] This check box is selected by default. You should select this check box if you need ‘e Scan to scans and blocks all Web sites that contain malicious code.
- Actions This section helps you select the actions that ‘e Scan should perform when it detects a security violation.
- Log Violations - [Default] This check box is selected by default. You should select this check box if you need Web Protection to log all security violations for your future reference.
- Shutdown Program in 30 Secs. You should select this check box if you need Web Protection to shut down the browser automatically in 30 seconds when any of the defined rules or policies is violated.
- Port Setting This section helps you specify the port numbers that ‘e Scan should monitor for suspicious traffic.
- Internet Access (HTTP Port) - Web browsers commonly use the port numbers 80, 88, 8080, 3128, 4480, and 6588 for accessing the Internet. You can add port numbers to the Internet Access (HTTP Port) box to monitor the traffic on ports.
- Content Type This section helps you block content based on their type.
- Block Images. You should select this check box if you need Web Protection to block images that appear on Web sites.
- Block Applications. You should select this check box if you need Web Protection to block applications on Web sites from executing.
- Block E mails (RFC 822). You should select this check box if you need Web Protection to block messages belonging to the RFC 822 format.
- Block Audio files. You should select this check box if you need Web Protection to block audio files on Web sites from executing.
- Block Video files. You should select this check box if you need Web Protection to block video files on Web sites from executing.
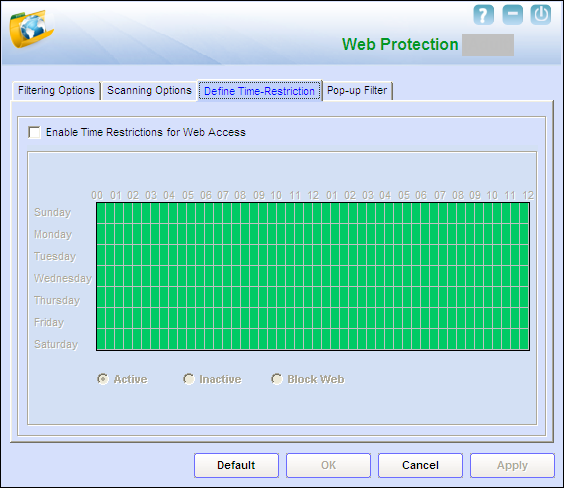
- III) Define Time Restriction - This section helps you define policies to restrict access to the Internet.
- Note: This tab is not displayed if you select the Block Web Access option on the Filtering Options tab.
- Enable Time Restrictions for Web Access: You should select this check box if you need to place restrictions on when a user can access the Internet. All the elements on this page are disabled by default. They are enabled only when you select this option. In addition to this check box, the Define Time Restriction tab displays a grid, which contains the schedule for allowing Internet access.
- Timing Grid: When you select the Enable Time Restrictions for Web Access check box, the Timing Grid is enabled.
- Timing Grid: When you select the Enable Time Restrictions for Web Access check box, the Timing Grid is enabled.
- Note: You can activate or block Web access or deactivate time restrictions for a minimum duration of 30 minutes and not less than that.
- Rows: The gird has seven rows; each row headed by a day of the week. The first row has the heading as “Sunday,” the next row has the heading as “Monday,” and so on up to “Saturday.” These row headings are displayed on the left of the grid.
- Columns: The grid has 48 columns of colored blocks. Each block represents 30 minutes. On the grid, the column heading 00 represents 00:00 hours. The next heading 01 represents 01:00 AM, and so on up to 12 (last column heading), which represents 11:59:59 PM.
- For example, on the first row, the block to the immediate right of the line labeled 02 represents 30 minutes. If you count two blocks to the right of 02 on the same row, this will represent 1 hour.
- The grid is divided into two groups as follows:
- 00 to 12: This group comprises 24 colored blocks. The first block has the heading as 00, the third block has the heading as 01, and so on up to 12 in increments of 01. This group represents the time from 00 hours (i.e, 12:00 A.M. [midnight]) to 12:00 P.M. (noon).
- 01 to 12: This group also comprises 24 colored blocks. The next block has the heading as 12, the third block has the heading as 01, and so on up to 12 in increments of 01. This group represents the time from 12:00 P.M. (noon) to 11:59:59 P.M. (midnight).
- Three option buttons are displayed below. These buttons are disabled initially. They are enabled only when you select the Enable Time Restrictions for Web Access check box.
- Active [Default]: This option has a color code of green. You should click this option when you want to enable Web access for a given period of time.
- Inactive: This option has a color code of blue. You should click this option when you want the Web Protection to become inactive for a given period of time.
- Block Web: This option has a color code of red. You should click this option when you want to block Web access for a given period of time.
- How to Use the Grid-based Timing feature (Timing Grid)
- You can use the Timing Grid to specify the duration for which the Web Protection module should be active, inactive, or blocked. For this, you should select the required option button and then click the block corresponding to the time on the grid.
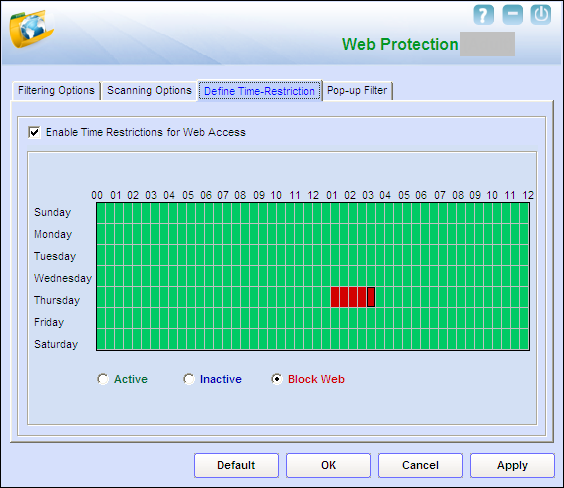
- For example, if you want to block Web access from say, 01:00 A.M. to 03:30 A.M. on Thursday, you should perform the following steps.
- 1. On the Define Time-Restriction tab, click Block Web.
- 1. On the Define Time-Restriction tab, click Block Web.
- 2. Next, on the grid, on the row having the heading as Thursday, find the block to the immediate right of the line labeled 01 (00 to 12 group), and then click it. This is the block corresponding to 01:00 A.M.
- 2. Next, on the grid, on the row having the heading as Thursday, find the block to the immediate right of the line labeled 01 (00 to 12 group), and then click it. This is the block corresponding to 01:00 A.M.
- 3. Then, on the same row click the next four blocks adjacent to this box. Ensure that the last block is the one next to the line labeled 03 on the grid (on the same row). This will block Web access from 01:00 A.M. to 03:30 A.M. every Thursday.
- 3. Then, on the same row click the next four blocks adjacent to this box. Ensure that the last block is the one next to the line labeled 03 on the grid (on the same row). This will block Web access from 01:00 A.M. to 03:30 A.M. every Thursday.
- Note: You can also color a range of blocks by clicking the first block and then dragging the pointer to the last block in the range.
- Note: You can also color a range of blocks by clicking the first block and then dragging the pointer to the last block in the range.
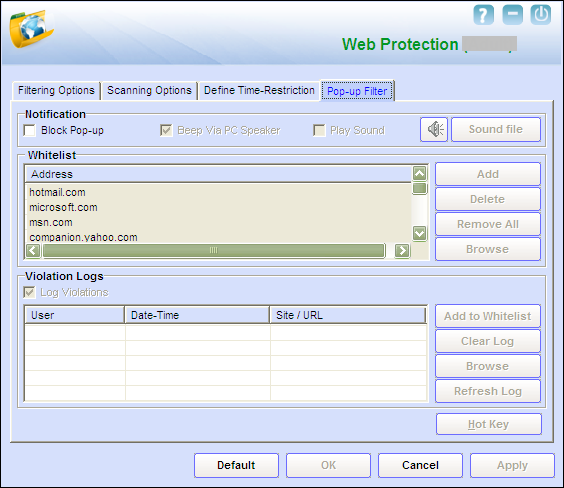
- IV) Popup Filter - This section includes options for customizing notification alerts, whitelist, and violation logs for pop-ups.
- Notification Section In this section, you can configure the different ways of notifying the user of a pop up.
- i. Block Popup. You should select this check box if you need Web Protection to block pop ups from Web sites.
- ii. Beep Via computer Speaker. You should select this check box if you need the computer beep when a pop up is encountered and blocked.
- iii. Play Sound. You should select this check box if you need the computer to play a selected sound when a pop up is encountered or blocked.
- This button plays the selected sound file.
- Sound file - You can click this button to select the sound file to be played when the ‘e Scan blocks a pop up.
- White List Section This section helps you customize the list of Web sites whose pop ups will not be blocked by the Pop up Filter.
- Add - You can click this button to add a Web site to the whitelist. This will ensure that the pop ups from that Web site are not blocked by ‘e Scan.
- Delete - You can click this button to remove a Web site from the whitelist.
- Remove All - You can click this button to remove all listed Web sites from the whitelist.
- Browse - You can click this button to open any of the Web sites in the whitelist.
- Violation Logs section This section helps you customize the activities related to pop ups.
- Log Violations - This option helps you log all the violations.
- Add to White List - You can click this button to add the Web site for which the pop up blocked to the whitelist.
- Clear Log - This option helps you clear the log file.
- Browse - This option helps you browse the Web sites listed in the violation log.
- Refresh Log - This option refreshes the log files and displays the latest log files.
- Hot Key - This option helps you to assign a key, which when pressed allows you to allow pop ups temporarily for the Web site being accessed.
Reports section
- This section displays the following information.
- Total Sites Scanned - It shows the total number of Web sites scanned by Web Protection.
- Total Sites Blocked - It shows the total number of Web sites blocked by Web Protection.
- Last Site Scanned - It shows the name of the last Web site scanned by Web Protection.
In addition, you can view the following reports.
- a. View Web Protection Log - This link opens the Web Protection View Log Violations window, which displays the details of the security violations that occurred while a user was online.
The Web Protection View Log Violations window
- This window displays the log file for Web Protection. It displays information such as the user name, date and time when the violation occurred, the URL of the Web site, the reason for the violation, and the word or phrase that triggered the violation event.
The log window displays the following options.
- Refresh - This option refreshes the log file and displays the latest information added to the file.
- Print - This option opens the PrintPreview for Violations.Log window, which shows the print preview for the violations log file.
- Search - This option helps you search for a specific word or phrase in the log file.
- Cut - This option moves the selected text to the clipboard.
- Copy - This option copies the selected text to the clipboard.
- Select Fonts - This option changes the font of the text in the table.
- Select Font Color. This option changes the font color of the text within the table.
- Bold - This option changes the format of the text in the table to bold.
- Italic - This option changes the format of the text in the table to italic.
- Underline - This option underlines the text within the table.
- Clear/Delete Log - This option clears the log file.
- b. View Popup Filter Log - This link opens the Web Protection View Popup Filter Log window, which displays the details of the pop up windows generated by Web sites that you visited.
The Web Protection View Popup Filter Log window
- This window displays information such as the user name, date and time when the pop up window was displayed, the URL of the Web site, the reason for the violation, and the word or phrase that triggered the violation event. The log window displays the following options.
- Refresh - This option refreshes the log file and displays the latest information added to the file.
- Print - This option opens the PrintPreview for Violations.Log window, which shows the print preview of the violations log file.
- Search - This option helps you search for a specific word or phrase in the log file.
- Cut - This option moves the selected text to the clipboard.
- Copy - This option copies the selected text to the clipboard.
- Select Fonts - This option changes the font of the text in the table.
- Select Font Color - This option changes the font color of the text within the table.
- Bold - This option changes the format of the text in the table to bold.
- Italic - This option changes the format of the text in the table to italic.
- Underline - This option underlines the text within the table.
- Clear/Delete Log - This option clears the log file.
- c. View Report - This link displays the Report for Web Protection window.
The Report for Web Protection window
- This window displays the report for the Web Protection module for a given range of dates filtered by the User accounts on the system(Admin User can access reports of all other user accounts but other users can access reports of their own account only), the generated report is displayed in a tabular format when you click the Generate Report button.
- Generate Report - You should select a range of dates and Filter by option and then click this button to generate a report for the Web Protection module for that range of dates.
