From eScan Wiki
| · eScan · MailScan · Technologies | · Technical Info · Security Awareness · User Guides |
eScan Version 11(and above) Online Help
File Anti-Virus
This section provides the description of eScan’s File Antivirus and various settings that can be configured for Real time Monitoring by File Antivirus for any malicious objects and actions to be taken on detection.
Contents |
Description
Most antivirus software do not scan ULead® Photo Express® Saved Image (UPX) files, archive files, and compressed files. Hackers often take advantage of this fact and hide malicious code in these types of files. The powerful File Anti Virus monitor of ‘e Scan uses ODS with Cache Technology to scan your computer. It scans individual files, archives, and self-extractor files, such as ZIP files, CAB files, RAR files, and ACE files for malicious software and thus prevents any malware from infecting your computer. In addition, the File Anti-Virus monitor constantly checks files and scans them for unauthorized changes whenever they are accessed or modified.
When you select the File Anti Virus icon, the tabbed page provides you with information regarding its status, options for configuring the module, and links to reports on the recent scans performed by the module.
The tabbed page shows two sections: Configuration and Reports. These two sections are described as follows:
Configuration
This section provides you with information regarding the status of File Anti Virus and proactive scan. It also shows you the default action that File Anti Virus will perform when it detects a malicious object.
This section displays the following information.
- File Anti Virus Status : It shows whether File Anti Virus is running or not.
- Proactive Scan Status : It displays whether proactive scanning is enabled or not.
- Action : It shows the action that ‘e Scan will perform when a malicious object is detected by File Anti Virus.
In addition, you can configure the following settings.
- Start/Stop - This link enables or disables the File Anti Virus module. You can easily switch File Anti Virus from the start state to the stop state and vice versa by using this link.
- Settings - This link opens the File Anti Virus Settings dialog box, which helps you configure the File Anti Virus module for real time monitoring.
The File Anti Virus Settings dialog box
This dialog box has two tabs: Objects and Options . These tabs are described as follows:
I. Objects
This tab displays the available drives on the computer. It allows you to configure the actions that File Anti Virus should perform when it encounters a security threat during the scan operation.
This tab is divided into two panes, they are described as follows.
- The left pane :- This pane displays all the removable and non removable drives, network drives, installed drives, and mapped drives that File Anti Virus can monitor or scan. All the drives displayed on the left pane are selected by default.
- The right pane :- This pane provides you with a number of settings for fine-tuning the File Anti Virus module as per your requirements. For example, you can configure module to scan specific storage devices or exclude files of a given file type.
- A. Action in case of virus detection - This section lists the different actions that File Anti Virus can perform when it detects a virus infection. These actions are described as follows:
- Report Only – If you select this option, File Anti Virus only displays a message informing you about the virus infection; it does not take any action on the infected object.
- Disinfect – [Default] This option is selected by default. For best results, you should keep this option selected. If you select this option, File Anti Virus cleans the infected object.
- Make backup before disinfection option – At times, File Anti Virus may find that a system file is infected and deleting the file may cause the operating system to become unstable. By selecting this check box, you can ensure that ‘e Scan creates a back up of the infected file in a non executable format before it cleans or deletes the file.
- Note: It may not always be possible to clean an infected file. In such cases, antivirus software often quarantine or delete the infected file. With ‘e Scan, you can configure File Anti Virus to quarantine, delete, or only alert you regarding the status of the infected files after ‘e Scan has found that they cannot be cleaned.
- If disinfection is impossible - You can configure File Anti Virus to perform any one of the following operations if it is unable to clean an infected file.
- Report Only - When you select this option, File Anti Virus only reports that the infected object cannot be cleaned; it does not take any action on the object.
- Quarantine Object - [Default] When you select this option, File Anti Virus quarantines the infected object.
- Delete Object - When you select this option, File Anti Virus deletes the infected object.
- Quarantine Object - When an infected file is quarantined, it is moved to an area of the memory from where it cannot cause any harm to the existing files or programs. You should select this option when you need to prevent other files or objects from accessing the infected object without actually deleting it.
- Delete Object - If you select this option, File Anti Virus will delete the infected object.
- B. Scan local removable disk drives - [Default] You should select this check box if you need to scan all the local removable drives attached to the computer.
- C. Scan local hard disk drives - [Default] You should select this check box if you need to scan all the local drives attached to the computer.
- D. Scan network drives - [Default] You should select this check box if you need to scan all the network drives, including mapped folders and drives, attached to the computer.
- E. Scan files of following types - You should select this option if you need to scan files of the types listed under the following categories.
- All Infectable - [Default] If you select this option, File Anti Virus scans only the predefined objects in the list of files or objects that are prone to infection as per the ‘e Scan’s virus signature database.
- All - If you select this option, File Anti Virus scans all the files and objects in the computer.
- By Mask - If you select this option, File Anti Virus scans all the file types listed in the Scan file types by mask dialog box. ‘e Scan provides you with a list of default files and file types. You can add more items to this list or remove items as per your requirements.
- Add / Delete - The Scan file types by mask dialog box is displayed when you double-click this option. You can use this dialog box to add or remove an item from the list of files and file types that File Anti-Virus will check during a scan operation.
- F. Exclude by mask – [Default] You should select this check box if you need the File Anti Virus monitor to exclude all the objects in the Exclude by mask list during real time monitoring or scanning. You can add or delete a file or a particular file extension by double-clicking the Add / Delete option.
- Add / Delete – The Exclude by mask dialog box is displayed when you double-click this option. You can use this dialog box to add or remove an item from the list of files and file types that File Anti-Virus will exclude during a scan operation.
- G. Not a virus list – [Default] File Anti Virus is capable of detecting riskware. Riskware refers to software that are originally not intended to be malicious but somehow can pose as a security risk to critical operating system functions. The Not a virus option helps you list riskware and prevents File Anti Virus from taking any type of action on those objects. You can add the names of riskware, such as remote admin software, to the riskware list in the Not a virus list dialog box by double-clicking the Add / Delete option if you are certain that they are not malicious. However, this list is empty by default. You can add programs to this list if you are certain that they are not malicious.
- H. Exclude folders - [Default] You should select this option if you need File Anti Virus to exclude all the listed folders and sub folders while it is monitoring or scanning folders. You can add or delete folders from the existing list of folders from the Exclude Folders dialog box. This dialog box opens when you click the Add / Delete option.
- I. Scan compound objects - [Default] You should select this check box if you need ‘e Scan to scan archives and packed files during scan operations.
- J. Enable code analyzer - You should select this check box if you need ‘e Scan to scan your computer for suspicious objects or unknown activity by using the heuristic analyzer. When this check box is selected, File Anti Virus not only scans and detects infected objects by using the definitions or updates, but it also checks for suspicious activity happening within your computer.
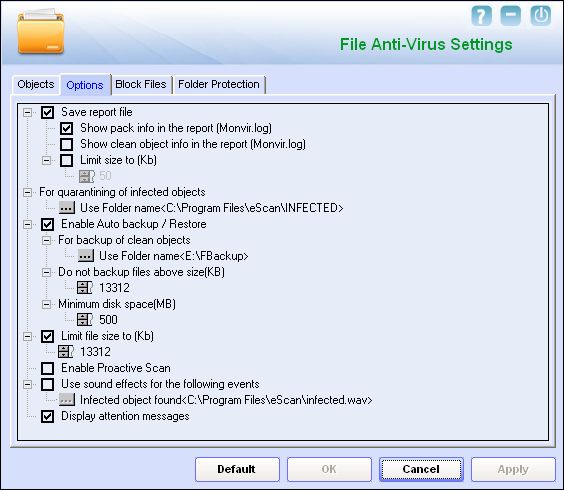
II. Options – This tab helps you configure the basic settings for the File Anti Virus module, such as the maximum size of log files and the path of the destination folder for storing log files, quarantined objects, and report files.
This tab allows you to configure the following settings.
- i. Save report file - You should select this check box if you need ‘e Scan to save the reports generated by the File Anti-Virus module. The report file logs information about the scanned files and the action taken by File Anti Virus when an infected file was found during the scan.
- Show pack info in the report – You should select this check box if you need File Anti-Virus to add information regarding scanned compressed files, such as .ZIP and .RAR files to the Monvir.log file.
- Show clean object info in the report - You should select this check box if you need File Anti-Virus to add information regarding uninfected files found during a scan operation to the Monvir.log file.
- Note: You can select this option to find out which files are not infected. This information is useful during debugging.
- Limit size to (kb) – You should select this check box if you need File Anti-Virus to limit the size of the Monvir.log file. You can double-click the size box and specify the size of the log file.
- ii. For quarantine of infected objects – This option helps you specify the destination for storing quarantined objects. By default, the quarantined objects are stored in the C:\Progra~1\eScan\Infected folder. You can change the location of the destination folder if required.
- iii. Enable Auto backup / Restore - This option helps you back up files and objects before File Anti Virus scans them and restore them if required. The following are some of the settings that you can use with this option.
- For backup of clean objects - You can back up uninfected objects and store them in a given folder. By default, these objects are stored in the \FBackup folder. You can change the destination of the backed up objects if necessary.
- Do not backup files above size(KB) - This option helps you prevent File Anti Virus from creating backups of files that are larger than the file size that you have specified.
- Minimum disk space(MB) - This option helps you allot the disk space to be allotted for storing log files.
- iv. Limit file size to (KB) - This option enables you to set a limit size for the objects or files to be scanned. The default value is set to 1024 Kb.
- v. Enable Proactive Scan – When you select this option, File Anti Virus checks your computer for suspicious applications and prompts you to block such applications.
- vi. Use sound effects for the following events – This option helps you configure ‘e Scan to play a sound file and show you the details regarding the infection within a message box when any malicious software is detected by File Anti Virus.
- Note: To use this feature, the computer’s speakers need to be switched ON.
- vii. Display attention messages - When this option is enabled, ‘e Scan displays an alert, which displays the path and name of the infected object and the action taken by the File Anti Virus module.
III. Block Files
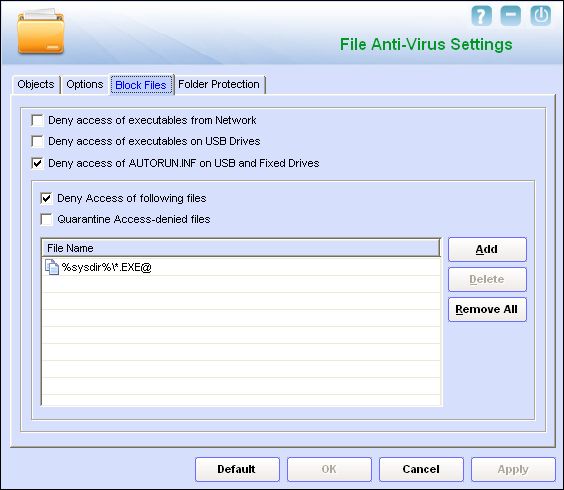
This tab helps you configure settings for preventing executables and files, such as autorun.inf, on network drives, USB drives, and fixed drives from accessing your computer.
This tab allows you to configure the following settings.
- i. Deny access of executables from Network - You should select this check box if you need to prevent executables on network drives from accessing your computer.
- ii. Deny access of executables on USB Drives - You should select this check box if you need to prevent executables on USB drives from accessing your computer.
- iii. Deny access of AUTORUN.INF on USB and Fixed Drives - You should select this check box if you need to prevent executables from USB and fixed drives from accessing your computer.
- Deny Access of following files - You should select this check box if you need to prevent the files in the list from running on your computer.
- Quarantine Access-denied files - You should select this check box if you need to quarantine files that have the Access-denied protection on them.
You can prevent specific files from running on your computer by adding them to the Block Files list. By default, this list contains the value %sysdir%\*.EXE@.
- Add : You can click this button to add a file to the Block Files list.
- Delete : You can click this button to remove a file to the Block Files list.
- Remove All : You can click this button to remove all files from the Block Files list.
IV. Folder Protection
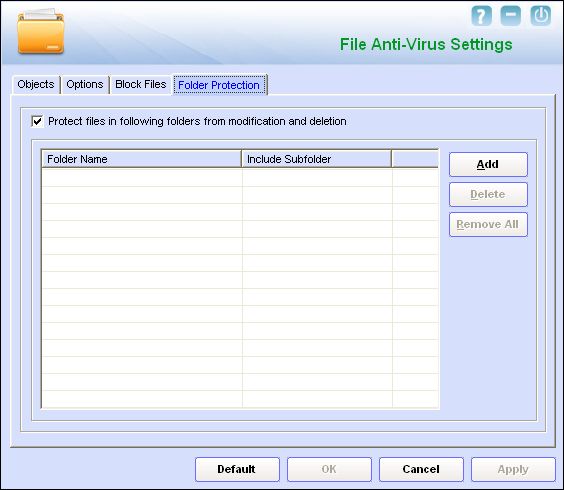
This tab helps you protect specific folders from being modified or deleted.
It allows you to configure the following settings.
- Protect files in following folders from modification and deletion. [Default] This option is selected by default. You should select this check box if you need the File Anti-Virus module to protect files in specific folders from being modified or deleted.
You can protect your folders from being modified or deleted by adding them to the list.
- Add. You can click this button to add the name of folder that you need to protect from modification or deletion.
- Delete. You can click this button to remove the name of a folder from the list.
- Remove All. You can click this button to remove all files from the list.
Reports section
This section displays the following information.
- Total Files Scanned – It shows the total number of files scanned by the real-time File Anti Virus monitor.
- Dangerous Objects Detected – It shows the total number of viruses or malicious software detected by the File Anti Virus monitor on a real-time basis.
- Last File Scanned – It shows the name of the last file scanned by the File Anti Virus monitor on real-time basis.
In addition, you can view the following reports.
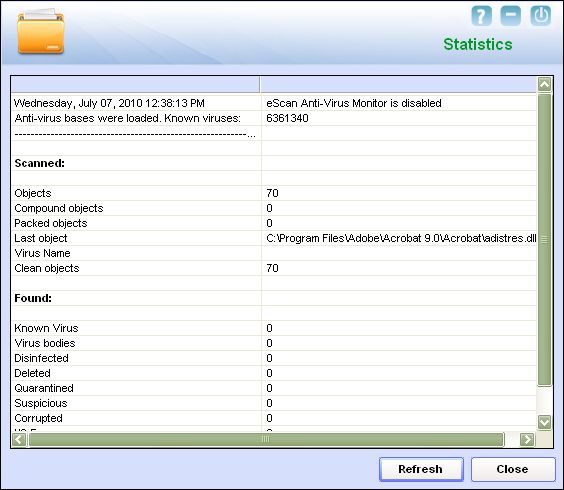
- a. View Statistics – This link displays the latest activity report of the real-time monitor.
In addition, it displays the following information.
- The current details of the system date, time, and whether the ‘e Scan Anti Virus monitor is running or not.
- The number of viruses detected.
- The results of the most recent scan, such as the last object scanned and the name of the virus detected.
- b. View Quarantined Objects – This link opens the Quarantine dialog box.
The Quarantine dialog box
This dialog box displays the quarantined files and backup files. This dialog box has two tabs: Quarantine and Backup.
1. Quarantine - This tab displays the files that have quarantined. You can restore or delete the quarantined objects by right clicking the object and then click the appropriate option.
2. Backup - This tab displays the files that were backed up by File Anti Virus before it tried to disinfect them. You can restore or delete the objects that were backed up by right clicking the object and then clicking the appropriate option.
Additional buttons in the dialog box This dialog box also has following buttons These buttons help you restore or delete backup files depending on the tab that you have selected. The functionality of these buttons is discussed as follows:
- Restore. You can click this button to restore the selected quarantined or backup file.
- Delete. You can click this button to delete the selected quarantined or backup file.
- Delete All. You can click this button to delete all quarantined files or backup files.
Caution: Before clicking any of these buttons, you should ensure that you have selected the appropriate the row in the table for which you need to perform the action.
- C. View Report – This link opens the Report for File Anti Virus window.
The Report for File Anti Virus window
This window displays the report for the File Anti Virus module for a given range of dates in a tabular format when you click the Generate Report button.
- D. Generate Report – You should select a range of dates and then click this button to generate a report for the File Anti Virus module for that range of dates.


