From eScan Wiki
| · eScan · MailScan · Technologies | · Technical Info · Security Awareness · User Guides |
eScan Version 11(and above) Online Help
Update
Contents |
Description
This module automatically keeps your virus definitions up-to-date and protects your computer from emerging species of viruses and other malicious programs. You can configure Updater to download updates either from the MicroWorld Web sites or from the local network by using FTP or HTTP, based on your schedule as per your requirements.
When you click the Scan button, the tabbed page of ePC provides you with information regarding the last updated database and mode. It also provides you with options for configuring the module and helps you view reports on the recent scans performed by the module.
The tabbed page shows two sections: Configuration and Reports. These two sections are described as follows:
Configuration
- This section provides you with information regarding the status of the last database update. It also shows you mode in which the Update module is running.
- This section displays the following information.
- Last Database Updated - It shows when the ‘e Scan database was last updated.
- Run Mode - It displays the mode of operation the Update module: Automatic or Scheduled.
In addition, you can configure the following settings.
Update Now : This link helps updates the antivirus and antispam definitions via HTTP.
Settings : This link opens the Update Settings dialog box, which helps you configure Update for real time monitoring.
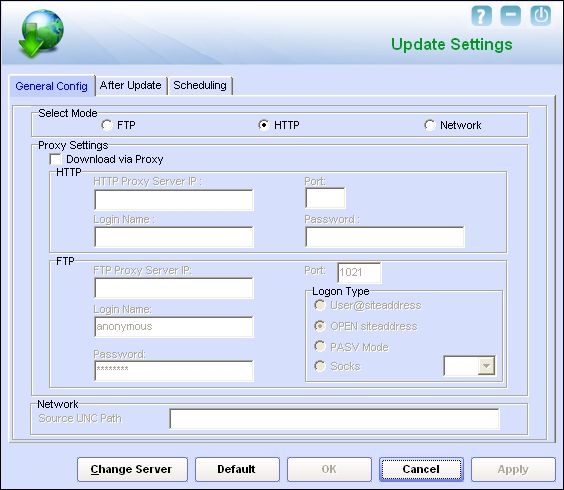
The Update Settings dialog box
- This dialog box helps you configure the update settings of real-time monitoring. This dialog box has the following tabs.
A) General Config tab :-
This tab provides you with options for configuring the Updater to download ‘e Scan updates.
- 1. Select Mode section – In this section, you can configure the mode for downloading updates.
- a. FTP - You should select the FTP mode if you need ‘e Scan to connect to the MicroWorld’s FTP sites for downloading updates.
- b. HTTP - You should select the HTTP mode if you need ‘e Scan to connect to the MicroWorld’s HTTP sites for downloading updates.
- c. Network - You should select the Network mode if you need ‘e Scan to use the Universal Naming Convention (UNC) to connect to another ‘e Scan computer on the network to download updates.
- 2. Proxy Settings Section :- In this section, you can configure the Internet connection for the proxy server.
- Download via Proxy – You should select this check box if your computer connects to the Internet via a proxy server. By default, all the options within this section are disabled. When you select this check box, depending on the mode that you have selected, the appropriate areas within this section are enabled.
- HTTP: This section is enabled when you select the HTTP mode for downloading updates. In this section, you must specify the IP address and port number of the proxy server. If the proxy server requires authentication, you must enter the valid login name and password for logging on to it. This section includes the following settings.
- HTTP Proxy Server IP - You should enter the IP address of the HTTP proxy server.
- Port - You should enter the port number of the HTTP proxy server that services HTTP requests.
- Login Name - You should enter the login name for logging on to the proxy server.
- Password - You should specify the password for logging on to the proxy server.
- FTP: This section is enabled when you select the FTP mode for downloading updates. In this section, you must add the IP address and port of the proxy server for handling FTP connections. If the FTP proxy server requires authentication, you must enter the valid login name and password for logging on to it.
- FTP Proxy Server IP - You should enter the IP address of the FTP proxy server.
- Port - You should enter the port number of the FTP proxy server that services FTP requests. The default port number is 1021.
- Login Name - You should enter the login name for logging on to the proxy server. The default login id is anonymous.
- Password - You should specify the password for logging on to the proxy server. The default password is anonymous.
- Logon Type: The types of logons allowed for the FTP server are as follows:
- User@siteaddress - You can log on to the proxy server by using this format for the user id.
- OPEN siteaddress - You can log on to the proxy server by using this format for the user id.
- PASV Mode - You can log on to the proxy server by using this format for the user id. When a computer connects to a proxy server, the proxy server may filter unwanted data and may not grant access to that computer. By using the passive or PASV mode, the server opens a random port that is not secured by the proxy and allows the computer to connect to the Internet.
- Socks - You can log on to the proxy server by using this format for the user id. You can select version specific numbers, such as 4, 4A, and 5 from the list box only when the Socks option is selected.
- Network: This section is enabled when you select the Network mode for downloading updates.
- Source UNC Path : You must specify the path of the networked computer, its shared drive, and directory of the ‘e Scan from where the updates will be downloaded.
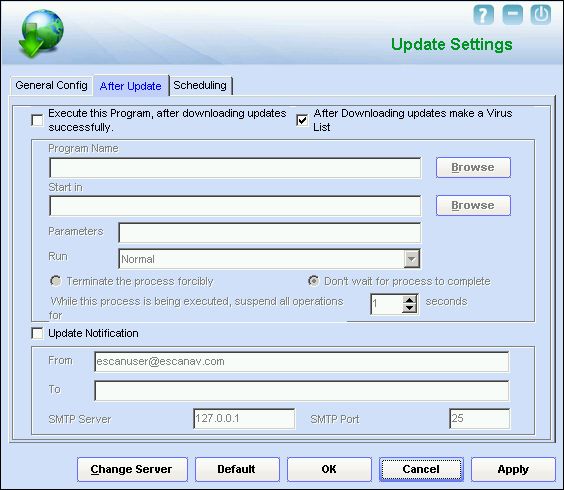
B) After Update tab –
- This tab helps you configure the basic settings for the Update module, such as the path of the destination folder for storing log files, quarantined objects, and report files; and the maximum size of log files.
- After Downloading updates make a Virus List - [Default] When you select this check box, ‘e Scan automatically creates a virus list after the updates are successfully downloaded.
- Execute this Program, after downloading updates successfully - When you select this check box, ‘e Scan runs a particular application or program after ‘e Scan updates are downloaded successfully.
- This section shows the following options.
- Program Name - Sometimes, you may need a particular program to run after you have downloaded updates for ‘e Scan. You can simply specify the path of the program in the Program Name box. Alternatively, you can use the Browse button to navigate to the path where the program executable is stored.
- Start In - You can also specify the program to start in a given location. You can specify the location in the Start In box. Alternatively, you can use the Browse button to navigate to the path where the program executable is stored.
- Parameters - Some programs require parameters to execute. You can specify the start parameters in the Parameters box.
- Run - Whenever a program runs, it runs in its own window. You can specify whether the window should be in the maximized, minimized, normal, or hidden state. The default state of the window is normal.
- Terminate the process forcibly - You can also forcibly terminate the process to free system resources by selecting this option.
- Don't wait for process to complete - A process may require a long time to complete. In such cases, you can allow other processes to run along with the specified process by selecting this option.
- While this process is being executed, suspend all operations for <placeholder> seconds - You can also ensure that the no other process runs while the specified process is running for a given time interval by setting the interval in the box.
- The options in the Execute this Program, after downloading updates successfully section are disabled by default.
- 3. Update Notification. When you select this option, ‘e Scan sends an e mail notification to the e mail address specified in the TO box in the Update Notification section.
- From. You can specify the sender’s e-mail address in the notification mail in this box. The default from address is escanuser@escanav.com.
- To. You can specify the recipient’s e-mail address in the notification mail in this box.
- SMTP Server. You can specify the IP address of the SMTP server in this box. The default SMTP IP address is 127.0.0.1.
- SMTP Port. You can specify the port number of the SMTP port in this box. The default SMTP port number is 25.
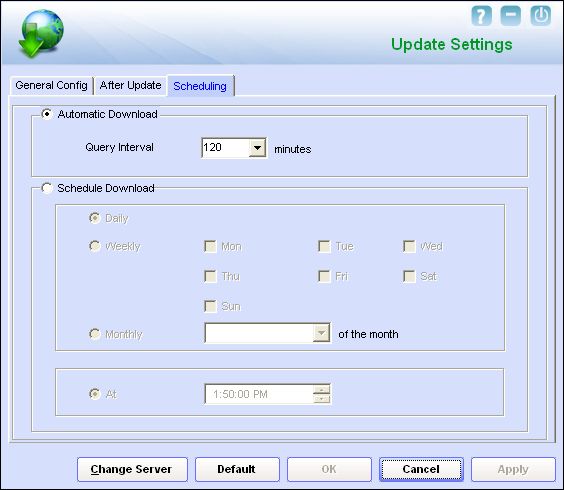
C) Scheduling –
- The Scheduler automatically polls the Web site for updates and downloads the latest updates when they are available. You can also schedule downloads to occur on specific days or at a specific time.
- A. Automatic Download - [Default] You can configure to automatically query and download the latest updates from the MicroWorld Web site when they are available.
- Query Interval - You can set the interval after which ‘e Scan should query the Web site for latest updates. By default, the query interval is 120 minutes.
- B. Schedule Download - You can also schedule downloads to occur on specific days or on a daily, weekly, or monthly basis at a specific time.
- Daily. [Default] You can configure the Scheduler to check for updates on a daily basis, which is the default option provided by ‘e Scan.
- Weekly. Alternatively, if you have limited bandwidth or if you are running memory intensive processes, you can schedule ‘e Scan to download updates on a day of your choice. You can select multiple days to ensure that your computer has the latest virus definitions.
- Monthly. If you do not use the Internet, install software on your computer, or access USB storage devices frequently, you can choose to download virus definitions on a monthly basis. However, as a best practice you should ensure that your virus definitions are always up-to-date to protect your computer from malicious software.
- At. ‘e Scan also provides you with the facility of downloading updates at a specific time. By default, ‘e Scan downloads updates at 1:50:00 PM. When you configure this setting, the Scheduler checks the MicroWorld Web site for latest updates at the specified time and downloads them if they are available.
- * Change Server - You can click this button to download updates from another ‘e Scan server.
Reports Section
This section displays the following information.
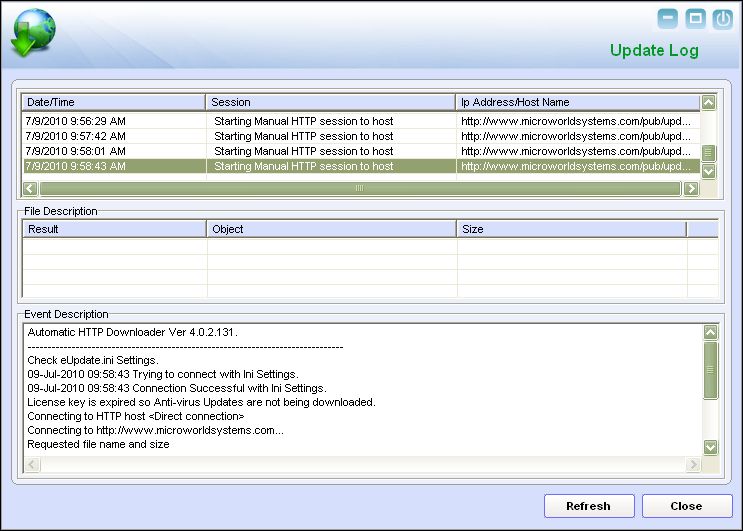
- * View Log - When you click this link, the View Update Log window is displayed. This window displays the latest activity report for the Update module.
- The View Update Log window
- This window displays the report for the Update module.
- This report includes the following information.
- The timestamp, session description, and host name or IP address.
- The file description such as the result of the download, the name of the object, and its size.
- The description of the event, such as the number of files downloaded, the time at which the connection was established or terminated, and the errors, if any.


