From eScan Wiki
Revision as of 09:50, 7 June 2013
eScan Version 11 Online Help
‘e Scan Protection Center
This section provides the description of eScan’s File Antivirus and various settings that can be configured for Real time Monitoring by File Antivirus for any malicious objects and actions to be taken on detection.
Contents |
Overview
‘The GUI is pleasantly straightforward and is designed to suit the needs of both novice and expert users. It provides you an option to switch back and forth between languages on your application, wherein you can choose the language of your choice, by using the keyboard. If you want to switch from your native language to English press SHIFT + F12 and for switching from English to your native Language press SHIFT + F5.
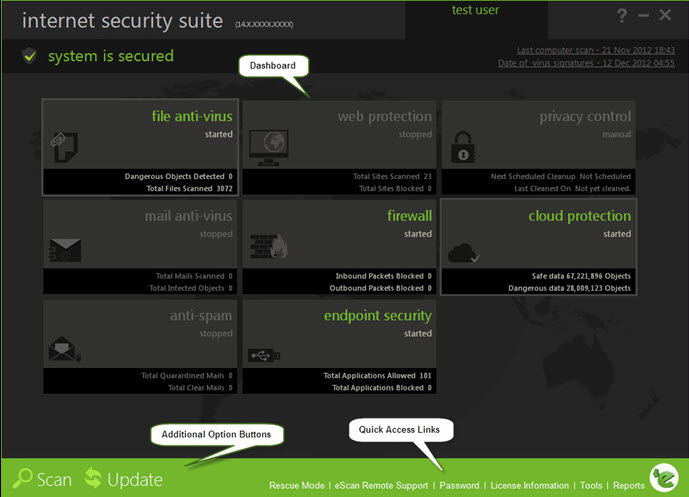
The main window is the dashboard. Dashboard is a special page that summarizes information on the modules. It contains product name, version number, real-time protection status (as √ system is secured in green colour or X system is not secured in red colour), date of last computer scanned, date of virus signatures, modules displaying the status information, additional option buttons, and quick access links.
On upper-left corner of the screen, you can view message as “√ system is secured” in green colour, only if the File anti-virus (real-time protection) is in enabled mode and if File anti-virus (real-time protection) is in disabled mode, the “X system is not secured” message is displayed in red colour.
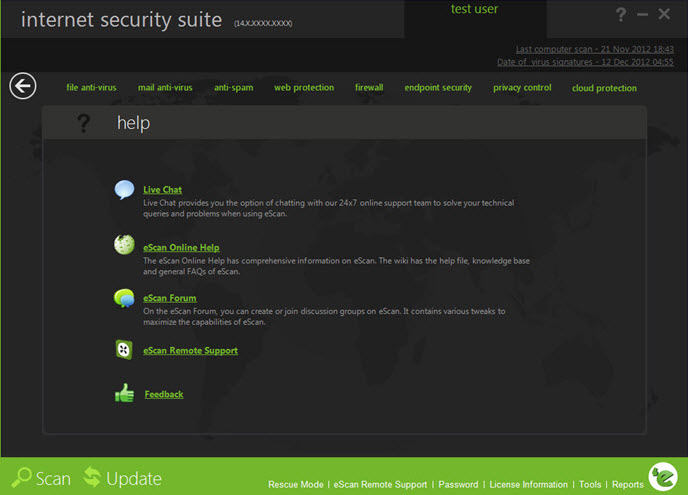
On upper-right corner of the screen, you can view the name of the user, help button, minimize button and close button. When you click help button, the following window appears
- Help Click this button, to access live chat, eScan online help, MicroWorld forum, eScan remote support, and feedback.
- Live chat : You need to have internet connection, to access this feature. You can contact eScan 24 x 7 online technical support team through chat either by clicking the Live Chat button or by visiting the following link.
- eScan online help: You need to have internet connection, to access this feature. eScan online help is located on the eScan wiki. It provides you with comprehensive information about products and features of eScan.
- eScan forums: You need to have internet connection, to access this feature. You can click this button to join the eScan forum and read the discussion threads on eScan.
- eScan remote support: Click this link, if you want to access the eScan remote support for troubleshooting queries or product assistance through remote connection.
- Feedback : Click this option to visit the eScan web site, where you can provide your feedback on various eScan products and send it to the eScan’s quality assurance team.
On upper-right corner of the screen, you can view the date, month, year, and time of when the last computer is scanned in the dd/Month/yyyy min: sec format. It also displays the date, month, year, and time when the latest virus signatures are updated in the dd/Month/yyyy format.
Modules
eScan for ISS provides you access to the following eight modules:
- File Anti-Virus: This module provides real-time protection to the files and folders existing on your computer.
- Mail Anti-Virus: This module prevents infected e-mails and attachments from reaching your inbox, and thus protects your computer from malicious programs that propagate through e-mails.
- Anti-Spam : This module helps you create and configure filters that filter emails based on keywords and phrases that appear within e-mails.
- Web Protection: This module helps you prevent offensive or pornographic content from appearing within a web browser.
- Firewall: This module helps you apply various expert rules for blocking specific ports, programs, or services on your computer.
- Endpoint Security: This module helps you protect your computer from infected devices like USBs, SD cards, Web cams, and CD/DVD ROM’s and also to control access to various applications through the blocking and whitelisting feature.
- Privacy Control: This module helps you clear your browser cache, history, cookies, and other personal information that may be stored within temporary files on your computer.
- Cloud Protection: This module helps you connect to all the eScan users around the world. The eScan Security Network (ESN) technology monitors, identifies, and blocks new threats with prompt response before they become widespread ensuring complete protection.
On the dashboard all the modules are displayed in sections. Each section represents the module of the eScan for ISS. You can click the individual section to view and access the protection status settings for the File Anti-Virus, Mail Anti-Virus, Privacy Control, Firewall, Endpoint Security, Cloud Protection, Anti-Spam, and Web Protection modules. By default, the File Anti-Virus, Firewall, Endpoint Security, and Cloud Protection modules are only enabled.
The names of the modules are highlighted in green colour whose protection is in start mode and those modules whose protection is in stop mode are highlighted in grey colour. Whichever module you want to view and access, just click that particular section from the Dashboard. For example, on the dashboard if you click File anti-virus section, the File anti-virus screen appears. If you want to go back to the previous screen, click the back icon on left-corner of the menu bar.
When you click any of the particular section, a separate screen is displayed with all the modules in the form of a tab. On the tabbed page, each module tab screen displays information regarding the selected module. The screen is divided into two sections — Configuration and Reports. These two sections are available only for File Anti-Virus, Mail Anti-Virus, Anti-Spam, Web Protection, Firewall, Endpoint Security, Privacy Control modules and Update option button.
- Configuration: This is the first section displayed on the tabbed page of each module. This section displays the status of the module, based on the settings that you configure with the help of the available buttons. The buttons are different for all the modules.
- Reports: This section helps you view the reports generated by the corresponding module.
Additional Option Buttons
On lower-left corner of the screen, you can view the two additional option buttons — Scan and Update, which helps you to configure settings for scanning and updates.
- Scan: Click this button, to access scan features, configure scheduled scans, or to run on-demand scans.
- Update: Click this button to configure daily/weekly/monthly updates. However, to download the latest updates, your computer needs to be connected to the internet.
Quick Access Links
On lower-right corner of the screen, you can view the following quick access links.
- Rescue Mode: Click this link, if you want to run the system in rescue mode. It is specifically designed to scan and clean your 32 and 64 bit operating systems, which have been infected. This mode is used when the infection is in memory or infection cannot be removed by anti-virus or malware removal tools. Rescue mode does not need any USB or CD/DVD.
- In Rescue mode malware does not get loaded in memory, it can also update its database, if system is connected to internet. It reverts damage done by malwares like task manager, registry editor is disabled.
- 2. eScan Remote Support: Click this link, if you want to access the eScan remote support for troubleshooting queries or product assistance through remote connection. This feature helps you request the assistance of an eScan technical support representative through a remote connection to your computer. It allows the eScan technical support representative to remotely take control and troubleshoot the eScan-related issues on your computer.
- For more information, refer http://wiki.escanav.com/wiki/index.php/Remote_Support link.
- 3. Password: Click this link, if you want to change the administrator password for eScan for ISS.
- 4. License Information: Click this link, if you want to register and activate the license key.
- 5. Tools: Click this link, if you want to access the eScan for ISS tools, such as Create eScan Rescue ISO Image File, Download Latest Hotfix (eScan), Safe Mode Protection, Download Latest Hotfix (Microsoft Windows OS), Send Debug Information, Restore Windows Default Settings, Upload Samples, and USB Vaccination.
- 6. Reports: Click this link, if you want to generate and view reports of File Anti-Virus, Mail Anti-Virus, Anti-Spam, Web Protection, Firewall, Endpoint Security, and eScan Cloud modules.


